VESSEL
HANDLING
(Extracts courtesy of A.N.T.A. publications, Ranger Hope © 2008 www.splashmaritime.com.au)
The
basics
Hull design
Propulsion
Specialised propulsion
Wind and current
Steering
Small craft manoeuvres
Moving ahead
Stopping
Turning
Berthing and leaving a berth
Anchoring
Larger craft manoeuvres
Manoeuvring difficulties of large vessels
Briefing crew
Turning
Mooring
Berthing and leaving a berth
Anchoring
Securing to a buoy
Interaction
Difficult conditions
Wind, swell and surf
Tidal streams
Small craft heavy weather
Large craft heavy weather
Crossing a bar
Small craft beach landing
Small craft and shallow water
Emergencies
Breakdowns
Towage
Emergency stops
Man overboard
The basics
The handling characteristics of any vessel depend on hull design, propulsion
and steering.
Hull design
There are two main types of hull design with variations of each type depending
on the intended use of the boat.
A displacement hull, whether underway or at rest, maintains the same draft.
.. ...................
Planing Hull .................................................................Displacement
Hull
They are usually heavier, or designed to carry heavy loads, and are slower because
all of the underwater part of the hull has to be ‘pushed’ through
the water. The power to weight ratio (power of engine compared to weight of
boat) is less than on planning vessels which makes them less responsive, taking
longer to pick up speed as well as longer to stop. The fixed rudder will produce
a larger, constant turn with a tendency for the vessel to lean outwards during
the turn.
In small boats, this type of handling would perhaps be found on a heavy timber
dinghy or a half cabin, with a small inboard engine.
A planing vessel at rest sits in the water in its displacement mode. When driven
forward at speed the hull design and the forward speed allows them to lift out
of the water so they virtually skim across the top of the water.
The power to weight ratio is greater by making the hull out of lighter materials
and increasing the power of the engine. They pick up speed quickly, go faster,
and also stop quickly as they come off the ‘plane’. Their behaviour
in a turn, especially at speed in a seaway is less predictable. All of these
things mean that a great deal more care must be taken to handle them sensibly
and safely.

The Underwater Profile
Most small boats that you will be handling will have planing hulls powered with
outboard motors, or inboard motors with stern drives in slightly larger boats.
Both of these configurations will behave in much the same way, and we will concentrate
our discussions on them.
 ....................
Outboard motor..........................................
Stern drive
If you take the helm of a displacement vessel with a conventional fixed propeller
and rudder you will notice the different handling characteristics. You will
learn more about this at Coxswain level, but should the occasion arise in the
meantime, take things slowly and carefully.
Propulsion
One of the things we use to control our vessel when manoeuvring is propulsion,
and so let’s look at propellers.

Propellers are sized by diameter and pitch.
The physical size of a propeller is measured by the diameter of the circle inscribed
by the tips of the blades. The diameter of the propeller on any boat will be
largely governed by the physical size of the boat itself.

Propeller Diameter & Pitch
The pitch of a propeller is best described as the theoretical distance the propeller
(and therefore the boat) would advance in one revolution.
As the propeller is rotating in a liquid, the boat does not advance the full
distance of the pitch because of ‘slip’. This is greatest when accelerating
under full power and becomes less when the boat is up to speed and planing.
Propeller pitch and cavitation.

Underwater view showing distance moved forward and cavitation forming on
the top of the propeller.
Propeller action: As the propeller turns the pitch or twist on each blade could
be likened to a swimmer reaching forward with each arm and pulling their body
forward. Each blade is doing a share of the work and so the more pitch (reach)
and the larger the surface area of each blade (diameter), the more work should
be done and thus the further (faster) your boat should go with each revolution.
Imagine how fast you could swim with four long arms with huge hands! Of course
you would need huge muscles to deliver the energy, and it is the same with your
boat. Your engine can only deliver so much energy or power and therefore your
propeller needs to be matched to the engine power just as your body would need
to increase strength to supply the energy for those four long arms!
If your engine is designed to deliver its’ maximum power at 4500 r.p.m.
your propeller needs to be the correct diameter and pitch to allow it to do
just that. Too much propeller will not allow your motor to attain its optimum
r.p.m. and thus is overworking and under performing. It will not give you maximum
speed and will use more fuel. Too little propeller will allow your motor to
over rev, possibly causing engine damage while still not giving you maximum
speed.
Forward and Astern Thrust:
Your propeller is primarily designed to give you forward propulsion and works
most efficiently when going ahead. The design of the hull of your vessel also
helps as you get a clear stream of unbroken water to the propeller which gives
it more ‘bite’ and reduces ‘slip’.
Power should be applied steadily from a standing start.
· Excess power can cause excess slip which breaks up the water causing
what we know as ‘cavitation’. This gets you nowhere! The underwater
picture on the previous page shows cavitation developing on the tips when the
blade is at the top of its turn.
· In a light vessel such as a tinnie or inflatable (especially when you
are sitting at the stern) there is a danger of the bow of the vessel coming
out of the water and in extreme cases turning backward on itself - and you!
· Your propeller is not as efficient going astern because of the shape
of the blades and the broken water caused by your stern wave and the blunt shape
of the transom. Don’t expect to stop as quickly as you start.
The size and design of your propeller depends on the usage of the boat. A boat
used for towing would require a very different propeller to one which required
speed only. Therefore, the propeller on a boat used for water skiing would need
to be something of a compromise between the two.
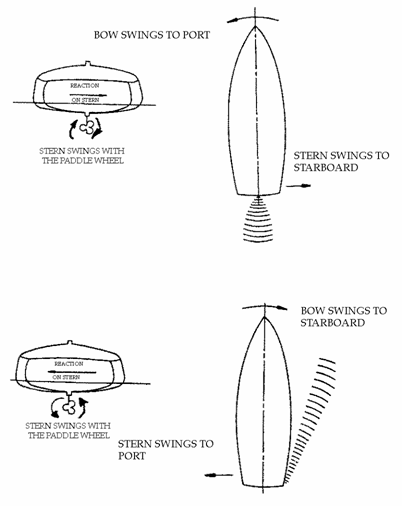
Transverse Thrust:
As well as forward and astern thrust, your propeller causes transverse or sideways
thrust. This is often referred to as ‘paddle wheel effect’. If the
pitch or twist in your propeller blades was such that they were parallel to
the shaft it would act as a paddle wheel and drag the stern of your boat around
in circles!
Depending on the design of the propeller and boat, transverse thrust will have
some sideways effect. Going ahead on a displacement vessel with a right handed
propeller (one that turns clockwise and viewed from astern) transverse thrust
will wind the stern of the vessel to the right or starboard and there will be
a corresponding movement of the bow to port.

Right handed propeller – transverse thrust
This is not all that noticeable when going ahead because the rudder takes care
of it. It will make its presence felt when going hard astern when there is broken
water over the rudder. The stern will wind to port and the bow will go to starboard
with very little you can do about it!
On light planing vessels with high powered outboard engines transverse thrust
shows itself in different ways but for the same reasons.
In figure 1.6 you can see that the motor, pivots around a point forward of the
leg which forms a type of rudder. The propeller sits behind this and pushes
the boat along.

Motor pivot point
When you put your motor into gear and apply power the propeller tends to wind
the motor to starboard causing the bow to go to starboard. The more suddenly
you apply power, the more dramatic will be the response. Keep a firm grip on
the wheel and anticipate it!
 ...............................
Right-handed propeller ..........................Drags
motor to starboard
Once at speed, this tendency to turn to starboard is corrected by the adjustable
trim tab fitted under the cavitation plate.

Trim tab
Another result of transverse thrust at speed is the tendency for your boat to
list or lean to one side. Because your boat is light and the engine powerful,
the leg tries to ‘climb’ out of the water. With a right handed propeller,
the leg will tend to ‘climb’ to starboard, causing a list to port.

Transverse thrust causing list

Weight counteracting propeller action
This can be corrected either
by placing the driving position and other heavy items on the starboard side,
or by fitting trim tabs on larger planing craft.

Trim tabs on larger
vessel
Larger vessels and Transverse Thrust:
Propellers are made for engine and gearbox combinations that turn the shaft
in either direction. They are described as either right or left handed. Looking
from astern a right handed propeller turns in a clockwise direction for ahead
power and anti-clockwise for astern (refer Fig 3.3). For a left handed propeller
the opposite applies.
The propeller rotates and draws us along using axial thrust and produces a side
effect called transverse thrust, also known as paddle wheel effect or prop walk.
Transverse thrust is caused by the increase in water pressure and density with
depth making the propeller blades more efficient at the bottom of their rotation.
The water flow to the blades at the top of the rotation may also be adversely
effected by hull form and obstructions.
Transverse thrust has the effect of trying to turn the vessel. A right handed
propeller will ‘walk’ the stern of a vessel to starboard and the
bow will swing to port when ahead power is applied. A helmsperson automatically
corrects for this by applying a small amount of helm. In the same vessel when
power astern is engaged the stern will ‘walk’ to port and the bow
swings to starboard. Adjustments to the helm will not counteract this.
Remember: The direction of ‘walk’ and bow swing will be the opposite
for a left handed propeller. Transverse thrust is most noticeable when power
is first applied to a vessel stopped in the water. It is more noticeable when
going astern than ahead.
The effect of transverse thrust with a right handed propeller going ahead
and astern.
The propeller/gearbox combined with the available power will decide how the
vessel will respond to the throttle. High speed vessels with a small diameter
heavily pitched fast spinning propeller and vessels designed for towing with
a large diameter moderately pitched slow spinning propeller will normally respond
well to the throttle. Vessels designed to motor economically will normally react
poorly to the throttle getting underway and stopping slowly.
Always identify the propeller and rudder characteristics of your vessel.
Turning Circle
Every Master needs to appreciate the turning ability of their vessel, i.e. the
distance it takes to turn and the time it takes to complete.
Example: Proceeding at 6 knots apply 10° of starboard helm and complete
a 360° turn (turning circle).

Observe the following during the turn:
• How far did the vessel advance and transfer before it was 90° off
the original track?
• How far are you
displaced off your original track half way through the turn (known as tactical
diameter)?
• Complete the turn.
Has your vessel turned inside the wake? Most probably yes.
Reason: once the rudder is applied it has to overcome the vessel’s momentum
before the turn commences.
Stopping
Every Master needs to appreciate the stopping ability of their vessel. It is
normally measured in vessel lengths.
It will depend on the vessel’s speed and manoeuvring characteristics (refer
3.1).
Stopping can obviously be achieved by going astern, in an emergency maximum
revolutions astern or even just place the throttle, at stop.
Until the Master identifies the manoeuvring characteristics, the vessel may
not be able proceed at a safe speed.
A vessel with a right hand turning propeller:
• will turn quicker
to port
• smaller turning
circle to port
By varying the rudder angle and speed you will start to appreciate your vessel’s
turning ability.
Before turning into a channel you can determine when to commence the turn to
avoid overshooting the leads.
Specialised Propulsion
This course discusses the handling characteristics of conventional power driven
single screw vessels. Other forms of propulsion are available, each giving different
handling characteristics.
Kort Nozzle
Many vessels designed for towing and fishing are fitted with a nozzle. A nozzle
directs the axial thrust and effectively negates transverse thrust. A vessel
with a fixed nozzle will have no transverse thrust and possibly poor steerage
until power is applied. A steering nozzle has no transverse thrust and steers
well ahead or astern but only when in gear.

Kort nozzle rudder (Gerr, Propeller Handbook)
Outboard Engine
Outboard engines steer well ahead and astern when in gear with no effective
steering in neutral. Twin outboards have some similar characteristics to twin
screws. When manoeuvring outboard engines are very responsive to throttle movements.

Jet Units
Jet boats draw water through a turbine and discharge via a moveable nozzle.
Used especially in shallow waters and surf regions, as the propulsion system
does not protrude below the hull. When in neutral the vessel will creep requiring
constant adjustment to hold position.
Variable Pitch Propeller

Controllable or Variable Pitch Propeller, as the name suggests the pitch of
the propeller can be changed as required. The benefit of this type of propeller
is that the engine need only turn the shaft in one direction and the ahead and
astern thrust is altered as the pitch of the propeller is changed. Variations
to a vessel’s speed are easy to make.
Azimuth or Z Propeller
Each unit can rotate through 360° and operate independently. A very manoeuvrable
propulsion configuration used mainly on tugs.

(Schottel)
If you encounter a specialised propulsion unit you must learn its special characteristics
and how to use them to advantage.
Twin Screw Vessels
In a twin engined vessel is the propellers are normally counter rotating, i.e.
when going ahead both propellers are rotating outwards. That is, the starboard
hand propeller is normally right handed and the port propeller left handed.
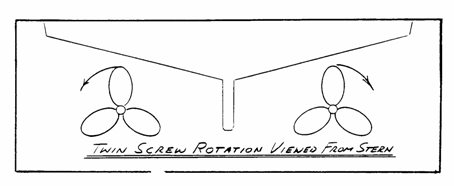
(Gerr, Propeller Handbook
There are numerous benefits of having twin propellers, those that effect vessel
handling are listed below:
• Extremely manoeuvrable
• Steering without
a rudder
• Negating transverse
thrust
Manoeuvrability
Due to the configuration of the propellers it possible to turn a twin screw
vessel around more easily than one with a single screw. To carry out this manoeuvre
engage ahead on one engine and astern on the other. Then adjust the throttles,
a few more revs are generally required on the astern engine to prevent headway
(movement forward). This action would cause the vessel to abreast, i.e. on the
spot.
Steering Without a Rudder
Whether going ahead or astern a twin screw vessel may be steered by adjusting
the revolutions and/or gear of each propeller.
Negation of Transverse Thrust
When both engines are engaged either ahead or astern each negates the transverse
effect of the other and the vessel should track straight. Transverse thrust
still exists and can be used to advantage in vessel manoeuvring.
You can estimate how you would expect a vessel to perform from a visual inspection,
only with practice and experience will you get a feel for that particular vessels
manoeuvring characteristics. For this reason it is essential to observe someone
else while they are manoeuvring the vessel and also practice under the supervision
of person who is familiar with the handling characteristics of that vessel.
Effect of Wind and Current
Wind
The hull and superstructure of all vessels act as a sail. The effect is most
noticeable when beam on to the wind and a light displacement vessel with little
wetted area is going to be effected more than a displacement vessel with large
wetted area.
This area exposed to the wind is known as the “windage area” and
a large superstructure either forward or aft will effect handling by creating
excessive windage in that area.

The angle between the vessel’s head and its course through the water,
attributed to the wind, is known as “leeway”. Leeway is commonly
observed by noting the difference between the vessels’ wake and the course
steered.
The effect of the wind varies according to the windage area of the vessel and
it is important for you as the master to be familiar with the effect of the
wind on your vessel in various conditions of loading.
Current
Tidal streams and currents move a body of water in a particular direction. In
a close manoeuvring situation, such as berthing or picking up a buoy, by approaching
into (stemming) the tidal stream or current the vessel will have greater manoeuvrability
at slow approach speeds (due the flow of water past the rudder) and a shorter
stopping distance.
If the current or tidal stream is in the same direction as the approach the
vessel will have poor steerage at slow approach speeds and increased stopping
distances, with a resultant increase in transverse thrust. However, if the current
is from abeam it would again cause problems preventing the vessel from coming
alongside the berth or bringing the vessel alongside at an increased speed.

(C R Twidale, Geomorphology)
Tidal streams in rivers and channels may reach up to 1½ knots at times.
When in flood, greater rates are often experienced. This diagram indicates the
typical path of the strongest stream in a winding river. Always be aware of
the set, i.e. the direction the stream will push you.
Always look at beacons, piles or buoys etc to estimate the set and rate of the
tidal stream. Compare a similar vessel to your own at anchor and note which
way it is resting, i.e. wind or tide rode.
The wind and current will always have an effect on your vessel and it will need
to be taken into consideration in all aspects of a voyage. Learn, where possible,
to use them to your advantage especially when berthing, casting off, anchoring,
picking up or leaving a buoy.
Steering
The steering characteristics of displacement craft with fixed propellers and
rudders and planing craft with outboard motors are vastly different.
The effectiveness of a conventional rudder is determined by the water flowing
over it, causing different pressures on either side. The stern moves toward
the low pressure side causing the bow to move in the opposite direction.

The pressure difference, and thus the effectiveness of your rudder, increases
with water flow over the rudder surface. It is at its maximum when:
· The vessel is travelling at speed
· The rudder is large – slow vessels have large rudders
· The propeller is turning creating water flow – short bursts of
power help in a slow turn
· You are manoeuvring into a tidal stream giving you extra water flow
It follows that as we slow down your steering diminishes very rapidly. You have
hardly any when out of gear and virtually none when going astern. Astern power
causes broken water to flow over your rudder and transverse thrust is likely
to take over.
It is worth noting here that in a turn it is the stern that moves first causing
the bow to move in the opposite direction. If the stern can’t move the
bow cannot respond. This is true of all boats, which means you must always be
aware of what your stern is doing.
Steering on an outboard or sterndrive powered boat depends mainly on the direction
of thrust. Remembering that the propeller is behind the pivot point of the leg,
it will either push or pull the stern of the boat where you point it. Although
the leg is shaped something like a rudder and does assist, it is the thrust
that does most of the work.


Note that if you don’t
have a forward steering position and are using the tiller arm on the motor,
it is turned in the opposite direction to where you want to go.
We don’t use transverse thrust with outboards and sterndrives to manoeuvre.
It means a lot of helm work but just point the propeller where you want to go.
· You will have virtually no steerage when out of gear which means your
prop must be turning right up to the last moment of any manoeuvre.
· Outboards have very poor stern power. However, as they steer as well
astern as ahead, we can afford to go much slower.
Small craft manoeuvres
Moving ahead
Before moving away from the jetty or beach there are a few things you should
check.
· Make sure your engine will start before ‘letting go’.
· Check that your passengers are seated safely.
· Check the stowage of all gear to make sure it doesn’t move about.
· Have weight distributed evenly so you are not badly listed. If you
know the vessel tends to ‘twist’ to port because of transverse thrust,
you could start off listed a little to starboard.
· Is your boat overloaded? Maintain plenty of freeboard.
When all is ready, move off steadily being aware of other vessels and speed
or wash restrictions.
To get up on the plane, apply power steadily remembering the problems of cavitation
and the boat rearing up. During this phase, weight distribution fore and aft
is important.
If you have too much weight forward, the nose will tend to bury itself and your
boat won’t plane.
If you have too much weight aft the nose will lift well out of the water and
your boat will once again refuse to plane and pick up speed. Too much power
in this situation can cause the back somersault problem. This is a common problem
in light dinghies and inflatables when you are by yourself and driving from
the stern. To get weight forward you sometimes need to extend the tiller arm
of the motor to allow you to move forward. In this case remember you need to
maintain positive throttle control!
Once on the plane we can make the final adjustments to make things comfortable
and get the best performance.
Firstly, make sure you are riding on an even keel so that you have equal freeboard
on both sides. If you have room, shifting people is probably the best way. In
a small boat, they must not stand up as this upsets the stability of the vessel.
In choppy conditions this could cause the boat to capsize.
Secondly, we need to ‘trim’ the vessel lengthways. Many outboards
and sterndrives are capable of being trimmed mechanically while you are moving
along by changing the angle of the motor. On smaller motors this can be done
by changing the pin in the adjusting holes in the mounting bracket. In this
case it would be trial and error until you became familiar with your boat and
the most common loading conditions.
If the propeller is trimmed too far towards the transom it will drive the bow
down into the water causing a wet bumpy ride.
Danger: Taking excessive water over the bow.

With the propeller too far
back from the transom the bow will rise too far out of the water. The boat will
tend to bounce over waves and be hard to steer.
Danger: Bouncing over a larger wave and turning over.

You will know when you have things ‘just right’. The ride will be
comfortable and you will hear your engine performing at its best. In anything
but the correct position you will lose engine rev’s and speed.

You will get optimum performance
and fuel economy if your boat is
trimmed correctly and not overloaded.
· Don’t run your engine at maximum rev’s for extended periods.
It usually means that you are wasting fuel with no significant gain in speed
and at the same time not doing your engine any good. From throttle wide open,
ease back slowly until you detect a slight drop in rev’s. This may cause
an insignificant drop in speed, but all of the rest of the throttle you were
using was wasted fuel.
· Always adjust your speed to sea conditions, other boats in the area
as well as hidden hazards.
Stopping
We all like the sensation of going fast but a wise skipper knows the relationship
between speed and stopping distance. Experience will tell you what this distance
is, but remember to try out each boat you drive in clear open water. They will
all be different and you must know what to expect.
A displacement hull will take longer to stop than a planing hull because of
its weight. Care must be taken to approach things slowly to allow plenty of
time to operate astern power, remembering the effect of transverse thrust.

Watch your stern wave
When a planing vessel is travelling at speed the hull is largely out of the
water. A sudden reduction in power will cause the boat to settle into its displacement
mode and stop very quickly. Great care must be taken because your stern wave
will catch up with you and there is a danger of it swamping the boat and motor.
At the very least, the stern wave will lift up your stern and push you forward
and so it is not the time to be applying lots of astern power.
Even in an emergency you can stop fairly quickly by a more gradual reduction
of power allowing the boat to settle in the water and then applying astern power.
Always remember to travel at a safe speed so you can anticipate dangers and
stop in time.
Turning
At Speed:
While the turning circle of a displacement vessel does not change with speed,
the same is not true of a planing boat. Its turning circle depends on how much
grip the hull can get on the water. When excessive helm is applied the boat
tends to lean into the turn, but with no keel and choppy seas it can easily
bounce and skate sideways across the surface. This is especially true if you
are ‘bow up’ and trying to turn into a stiff breeze. In choppy water
it is better to reduce speed and work the throttle to get the stern to dig in
and give you some grip, even if you have to come off the plane to do it.
When the stern does get a good grip the turn can be very severe and dangerous.
It could cause the boat to capsize or throw someone overboard.

Take care when turning tightly
You are very susceptible to capsizing forces if you skate sideways in a turn
in choppy seas. To turn sharply in any seas it is best to reduce speed first.
In tight spaces:
If you need to turn very sharply (say 180°) in a confined space with your
outboard and planing hull, there are two methods you can use.
In a vessel up to about 6 metres if you have lots of powers try this: From stopped,
turn the motor hard to port and positively apply full throttle for a short time.
The bow will rise, the stern will dig in and the boat will tend to pivot sharply.
Transverse thrust will help because you are going to port. You will cause some
water disturbance so don’t do it if it will upset others. Also, be careful
of the amount of power and don’t hold it on for too long! The idea is
to turn, not pick up speed.

A more sedate method and one suited to larger vessels is to proceed as follows:

Whether you turn to port
or starboard first depends on transverse thrust (port first will help) or whether
your motor turns further one way or the other. Try it out and go with the circumstances
at the time.
Twin screws:
You may know that to turn ‘short around’ with fixed propellers and
rudders on a displacement vessel we go ahead on one motor and astern on the
other. This is because the propellers are fixed as to their direction of thrust
and is especially effective if they are widely spaced.
If we do this with twin outboards, because the direction of the thrust turns
with the propellers, and because the propellers are usually close together,
it tends to have the opposite effect and slow the turn down as they fight against
each other as shown in the first diagram below.
A more effective way is to proceed as shown on the right and the manoeuvre can
be repeated until the turn is complete:

Berthing and leaving
a berth
Coming alongside and leaving a berth is one of the common manoeuvres you will
make. The secret is:
· Knowing your boat – its stopping and turning characteristics.
· Being competent in the basics of handling your vessel.
· Being prepared – having fenders and mooring lines ready and a
clear plan in your mind. If you have crew, let them know what you intend and
their role in the operation.
We will confine our discussions from now on to planing boats with outboard motors.
Don’t forget what we have already said about displacement hulls with fixed
propellers and conventional rudders. They will behave very differently to our
5 metre centre consul with a 50 hp outboard. For the moment we will leave wind
and current out of our procedure.
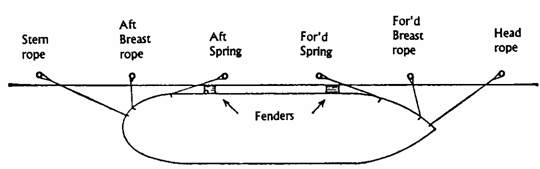
From a position alongside the jetty, our mooring lines may look like this:

For a 5 metre vessel, a
head and stern line as shown may be sufficient. They will keep your vessel from
moving out from the jetty especially if you take your stern line to the outside
bollard. This gives extra length and a better angle. In some conditions these
lines may not stop your boat from ‘ranging’ lengthways along the
jetty. If this is the case we use spring lines. These not only solve our ranging
problem but your forward spring is the most useful line when berthing and leaving
the jetty.

Note that your forward spring
comes from the fore port of your boat and stops it from ranging forward. Your
aft or back spring comes from the back of your boat and stops your boat from
ranging backwards.
One problem is that you seldom have enough cleats in the right places on a small
boat to handle all of these lines. The other problem is they are usually so
small that they can’t be used for two lines at a time or take more than
one turn around them.. You will have to make do with what you have.
Mooring lines should be of a suitable size for both strength and to allow a
couple of turns on the cleats of your boat. Splice an eye on one end and melt
the ends of the fibre on the other. They should be in good condition without
knots or splices so they will run freely and not jam on obstructions on the
jetty pile or bollard. They must be long enough to provide some ‘give’
as your boat moves gently, and to allow for any change in the tide.
How you leave the jetty will depend on many variables such as wind, the size
and weight of your boat, current and the extra pair of hands that a competent
crew can give. Here are a few suggestions to start you off.
What not to do: Don’t drop all of your lines and try to drive forward
and away from the jetty. Remember it’s the stern that moves first and
it will hit the jetty. Even worse it you are alongside an expensive large vessel!

What not to do!
Use a headline: Shorten your headline up and rig it ‘on the bight’.
This means you put the spliced end on your boat and run the line around the
jetty bollard and back to the boat. After starting your engine, let go your
other lines, and go astern with your propeller turned away from the jetty. Your
headline will hold you while your stern is pulled away from the jetty. When
angled up far enough, go back to neutral while the headline is let go and then
reverse away. The friction of two wraps around the jetty bollard should allow
you to hold the other end in your hand. When you let the tension off it will
run clear and you can retrieve it from the front cleat when well clear of the
jetty.

Leaving berth using
headline.
Use a forward spring: Rig your forward spring on the bight before letting go
your other lines and go ahead at idle with your propeller away from the jetty.
Your spring will stop you going forward and your boat will settle in alongside.
(Your stern can’t move and so neither will your bow!) With the correct
amount of rudder it will sit there quite happily while you take off your other
lines.

Holding alongside with forward spring.
Remaining ahead at idle, turn your propeller toward the jetty and the stern
will pivot away. At the desired angle, come to midships and reverse out letting
the spring go at the same time.

This would be the most common way to take our conventional displacement boat
out as well!
When backing out use a positive amount of power once your line is clear to stop
wind and tide taking over. Remember the inefficiency of your propeller in astern,
but also that you can steer quite efficiently.
Now that we are away from the berth, how do we get back in? Try following the
steps outlined below. You can adapt things for conditions later.
· Prepare your mooring lines and check the jetty for a suitable bollard.
· With outboards and stern drives you can berth equally well port or
starboard side to. If by yourself, berth on the side of driving position.
· Approach the jetty at an angle determined by the amount of room you
have (ie. other boats on the jetty).
· You should be in gear until the last moment to give you steerage but
at a speed that will allow you to stop in time.
· At the last moment, engage neutral, turn your propeller to the jetty
and then apply astern power. This will stop your boat and pull your stern alongside.
Depending on conditions and the number of helpers, you can then make yourself
secure.

Coming alongside with an outboard motor
If conditions are difficult
or you are by yourself, you will need to use a spring. It will work from any
near side cleat, but the shoulder one works best if you have one. If you haven’t,
use the stern cleat as show below.
Estimate the length you will require (about half the length of your boat) and
tie if off to the cleat leaving the spliced end free. When you stop your boat,
aim to have the driving position next to the bollard so you can drop the eye
over it.

Ease astern gently until
the line is under tension and while staying in gear adjust the angle of your
motor so your boat sits snugly alongside as it did when we were leaving. It
will stay there while you put on the remaining lines. You can then come out
of gear and shut your motor down.
Using fenders can save your boat, and perhaps others in the area, in case of
a ‘crash’ landing. Have them secured and ready before you berth.
This is especially important if you are coming alongside another vessel. In
this case, follow the same procedures as above. There will probably be people
on the other boat to lend a hand.
Anchoring
Anchoring is another routine task which shouldn’t present any difficulties
but often does. The problems can arise from lack of knowledge, but more often
from lack of planning and checking the simple things. Your anchor is also an
essential part of your safety equipment and may well get you out of trouble
one day. Let’s look at the basics of anchoring a small boat.
Anchors:
Of the many types available,
only a few are suitable for small boats. The C.Q.R. or plough, and the danforth
are designed for sand and mud. The danforth is easier to stow because it lies
flat. The plough is an excellent anchor best stowed hanging over the bow roller.
If you are anchoring in rock and reef, a reef pick is the best choice because
the arms will bend if sufficient pressure is applied and it can be dragged free.
It is sometimes impossible to free either of the other two in reef so take care.
Losing your anchor can spoil a good day and may put you in danger later in the
day if something else goes wrong. A sea anchor or drogue is also a handy piece
of equipment in emergencies as we will see later.
 .....................................
Danforth anchor ..............................................................CQR
plough anchor
 ..........................
Reef pick ................................................................Drogue
or sea anchor
Your anchor must be large enough to hold you in poor conditions but at the same
time be comfortably handled and stowed. Seek advice on size if you are not sure,
but common sense and experience should tell you if the anchor you have is suitable.
No anchor is suitable for all situations and so we need to choose the one which
will do the job best according to the most common type of bottom we will be
anchoring in.
Anchor cable: You have two choices which will depend on your needs and the size
of your boat.
Chain is the best choice because it is strong, heavy and can be used in conjunction
with the gypsy on your windlass if the size of your boat warrants one.

Anchor windlass
The chain should be attached to your anchor with a shackle of the same size
as the chain and the shackle should be moused (wire the pin to the body of the
shackle) to prevent it from coming undone.

Moused shackle
Make sure that the inboard end of the chain (the bitter end) is secured to a
strong point of your boat!
Rope is commonly used as anchor cable on small boats. Choose a synthetic (man
made fibre) rope as it is stronger and doesn’t rot. The size (diameter)
should suit the weight and windage of your vessel. You should also have about
four metres of chain shackled to your anchor and the rope shackled and moused
to the chain through a thimble spliced into the rope.

Thimble spliced into rope
Once again – don’t forget to tie off the inboard end!
The chain prevents chafing on the rope and provides weight to hold the shank
of the anchor on the bottom. Most inexpensive synthetic ropes float and we will
see how this would reduce the holding power of your anchor.
The length will obviously depend on the depth of the water you intend anchoring
in, but it should be at least four times the depth of the water.
Stowing: Your anchor and cable should be stowed so that it is ready for immediate
use in the case of an emergency. This means that:
· The cable should be shackled to the anchor and secured at the bitter
end to your boat.
· If the anchor is stowed to prevent it falling over the side in choppy
seas it should be easy to detach.
· Cable should be coiled or flaked so that it will run out easily without
tangling.
How your anchor holds:

Anchor action –
plough.

Anchor action – danforth

Scope
As you can imagine, it is impossible for a weight that you can comfortably lift
to hold a boat a great many time its own weight against wind and wave action.
You can see how the weight of chain helps and how the length of the cable compared
to the depth of water (scope) is vital to keep the cable pulling horizontally.
In the diagram above you can see that your cable develops a curve. Chain will
naturally do this and you can secure a weight on a rope cable to get the same
effect. As your boat moves, most of the work is being done by the cable being
lifted and pulled through the water before the weight goes onto the anchor.
A constant steady pull which straightens your cable must pull the anchor out.
You should notice your cable continuously straightening and then curving which
means your boat is ‘riding at anchor’.
Coming to anchor:
When coming to anchor, consider the following points:
· Is the anchor ready to let go?
· Am I anchoring in sand, mud, shale or rock and is my anchor suitable?
Shale has poor holding power and beware of rock and reef.
· What is the depth of water – do I have sufficient cable and is
there enough water to allow for tidal movement?
· If the wind changes, do I have swing room and would it put me in danger
of being blown onshore if my anchor drags?
· Are there other boats in the area that could cause problems?
Once you are satisfied, approach your spot into the wind (or current) slowly,
and proceed as follows:
· Stop your boat and let go the anchor.
· Allow your boat to drift back as you play out the desired amount of
cable. Don’t let your chain pile up on top of your anchor.
· Secure the cable. You should feel the anchor grip and bring your bow
into the wind or current.
· If it is not holding your cable will be straight and if you put your
hand on it, you will feel the anchor dragging over the bottom.
· Periodically check your position relative to other vessels or land
marks.
· If using rope cable, make sure it is not chafing where it goes over
the bow.
Remember, your anchor is only intended as a temporary mooring. No anchor will
hold indefinitely as conditions change and so it follows that someone should
be on board to continually check your position and take further action as required.
When anchoring in reef, especially coral reef, be aware of the damage your anchor
and chain does. Try and anchor in sand to windward and hang back onto the reef.
This will prevent damage and ensure you can retrieve your anchor when it is
time to go.
Retrieving your anchor:
The following are some common sense tips which may help when you are hauling
up your anchor:
· Always start your motor before you haul the anchor.
· Drive forward to take the strain off the windlass as you are retrieving
the cable keeping your bow into the wind..
· Stow cable and anchor securely ready for emergency use.

Stowing of anchor
Larger craft manoeuvres
Manoeuvring difficulties of large vessels
Larger vessels, due to their size, hull form and power are not as manoeuvrable
as smaller vessels. Stopping distances are increased by the huge momentum of
a large vessel, turning circles are large and response to the helm relatively
slow. All these factors make it harder for a larger vessel to make swift and
nimble manoeuvres as can be made by most small vessels. In light of the above,
the navigator on a small vessel must bear in mind these constraints on a larger
vessel before impeding its’ path or passing so close so as to not allow
any margin for error or the manoeuvring characteristics of the larger vessel.
Depending on the position of the accommodation on a large vessel it may have
large areas forward of the bow that are unsighted. In these areas if a small
vessel approaches so close, the watchkeeper of the larger vessel will lose sight
of the smaller vessel for a considerable length of time. This is extremely dangerous
as the watchkeeper may assume that the smaller vessel will pass clear under
the bow. If there is any alteration of speed of the smaller crossing vessel,
it would result in a collision and the small vessel being lost. On the other
hand, if the watch keeper of the larger vessel tries to manoeuvre to keep clear,
it could result in contact with the smaller vessel.
It is therefore essential when operating around larger vessels to give them
a wide berth and always be in sight of their watchkeeping position.
Briefing Crew
Well before the vessel is due to berth, anchor or conduct any evolution the
crew must be fully briefed.
A pre berthing brief may include the following:
wharf- Cairns No 2 abeam the Clocktower
which side to- port side
which lines- head rope, stern line and both springs
priority line- fore spring
fenders
tide/wind- floodstream, nil wind
stow unnecessary gear
check that all passengers are kept well clear
have the anchor ready to let go
any other safety consideration
Turning Short Round
The term, “turning a vessel short round”, basically means to turn
a vessel in the minimum possible space.
If your vessel has a single right hand turning propeller it will turn short
round easier to starboard. See Fig 3.14.
• Start the turn from the port side of the river (1).
• Wheel hard to starboard,
give a quick burst ahead. Do not gather too much headway. Stop engine (2).
• Wheel amidship,
give a quick burst astern (3), as sternway gathers the stern will move to port.
Stop engine
• Wheel hard to starboard,
use engine to complete the turn (4).

The transverse thrust of
the initial, forward, burst of power is trying to turn us to port. This is more
than overcome by the turning effect of the rudder as water is pumped over it.
The vessel will start to turn to starboard before it begins making way. The
transverse thrust from the burst of astern continues the turning motion of the
bow to starboard whilst the rudder is amidships.
In good conditions most vessels can be turned short round in two boat lengths.
Currents, tidal streams and strong wind will adversely effect the manoeuvre
particularly when beam on turning into the wind.
Mooring
The bow line runs through
the fairlead. The stern line runs through the after fairlead. These lines should
be run well along the wharf or berth and hold the vessel in.
Breast lines may be run perpendicular from the bow, midship or quarter to keep
the vessel from moving away from the wharf or berth.
Spring lines run from the bow and stern to stop ranging, (fore and aft movement
of the vessel).
When securing alongside attention must be paid to the range of the tide, at
high tide leave enough slack to ensure the lines do not part as the tide falls.
Mooring lines should be checked at each turn of the tide. Use only lines with
eyes spliced onto the shore end so the line can be tended on board. Avoid sharp
bends in the mooring lines where they pass through fairlead or chocks, use some
form of anti-chafing gear around the bends.
Securing the Line Inboard
There are many forms of fittings for this purpose, on large vessels the most
common are bitts (bollards), in smaller vessels we use cleats, stag horn bollards
or sampson posts, in all cases first take two full turns of the line around
the base before the line is secured with figure eights. Refer to Fig 3.27.
Dipping the Eye
If two bights or eye splices are to be placed over the same bollard, the second
should lead up through the eye of the first so that either can be removed independently.

Snubbing a Line
on a Cleat or Bitts
Never try to hold a vessel without taking turns of the line around the fitting.
Stand well back out of the bight of the line and at 90° to the angle of
pull.

Spring Lines
Learn how to use the spring lines, bow or stern, for manoeuvring the vessel
in and out of tight spaces. They can be used to spring a vessel onto or off
a wharf or berth, to clear other vessel or when being warped around the end
of the berth.
Mooring lines should be checked frequently for signs of wear or fatigue. When
not in use lines should be correctly stowed and protected from the weather and
direct sunlight.
Berthing and leaving a berth
Unless there are very pressing reasons such as wind, tide, or berthing space,
a vessel should always be berthed taking advantage of transverse thrust. That
is, port side to for a single screw vessel with a right handed propeller.
Before berthing check astern and ahead controls for operation. The basic approach,
no wind or tidal stream. Approach the berth with sufficient speed to ensure
positive steering, at an angle of around 20° with the bow heading for about
1/3 the vessel’s length back from the far end of the berth. When the bow
has nearly reached the required position headway is checked with a firm burst
of astern power. This will swing the stern in towards the berth,
Starboard side approach and bring the craft neatly alongside. See sketch port
side approach.
Port side approach:

Preferred berthing option (no wind or tide)
Look at the same approach for a vessel berthing starboard side to. When astern
power is applied the stern swings away from the wharf.
Berthing Starboard Side
Solution: Shallow approach 10-15°, when in position apply full port rudder
and kick astern to check headway and swing.
Even with no wind or tide, berthing starboard side to is difficult and requires
extra caution.
Tidal stream, if possible always stem the stream.
 ......................
Berthing.....................................................................................
Unberthing
Equally difficult is to come into a berth travelling in the same direction as
a strong tidal stream or current. If this is attempted the engine driving astern
has to take off the way of the vessel and provide speed astern through the water
equal to the tide or current. The craft should be turned to approach the berth
stemming the tide or current. If this is not possible mooring ropes may be required
to hold the bow to the berth as you turn the rudder away from the berth and
give the engine a short sharp burst ahead. This will cause the stern to pushed
towards the berth while the bow is kept in position by the mooring rope.
It is difficult, if not dangerous, to try to berth on the weather side of a
jetty or pontoon if the wind is strong. Under these conditions it is desirable
to seek a berth on the lee side.
Berthing Considerations
Wind onshore aim ahead of the berth – offshore aim near end of berth
When berthing alongside floating objects; if the object is bigger go to the
leeward side; if smaller go to windward.
Remember: If your approach is misjudged, abort the attempt. It is better to
have a dent in your pride then in your vessel.
Anchoring
• Plan your approach to the anchorage by heading into the wind or the
tidal stream (which ever is strongest).
• Manoeuvre as required
to the intended position.
• Stop engine.
If your vessel does not develop a slight sternway, give a short burst astern.
In a twin screw vessel normally one engine is sufficient.
• Let go the anchor. Let the cable run out freely until it reaches the
bottom.
• Ensure the vessel
has slight sternway to ensure the cable is being laid, not piled up. Refer to
Fig 3.15.
Beware of gathering too much sternway, the cable must always be under control.
When the final length of cable has been deployed secure the brake.
• Watch the cable as the vessel is “brought up” (has its cable).
This is a critical stage, because as the cable takes the weight of the vessel
it is important to observe the cable. If the anchor cable shudders or goes slack
and tightens again it indicates that the anchor has dragged on the bottom. The
cable should go taught and then slack again in a smooth fashion indicating that
the anchor has held.
• Watch the cable for a couple of minutes to ensure that the anchor does
not drag. A small amount of stern power may be required to ensure that the anchor
has ‘set’.

Securing to a Buoy.
The advantages of mooring to a buoy over anchoring are:
• You don’t need to worry about the anchor holding ground
• A much smaller swinging
circle and,
• You can expect it
to be more secure than any anchor.
A standard mooring buoy has a large eye at the top to which you may secure your
mooring line as described below. However, many smaller moorings have a securing
warp permanently shackled to the buoy or mooring chain.
The procedure outlined below is to moor to a standard buoy, if you moor to a
smaller buoy, the approach to the buoy remains the same. The main difference
being you can reach the warp with a boat hook or similar device and then drop
it over the bitts.
The first step in mooring to a standard buoy is to put a person (with a life
jacket on) onto the buoy, this will normally mean putting the dinghy in the
water or bring the vessel alongside the buoy and put the person across.
You can now approach the buoy slowly whilst stemming the wind or tidal stream
(which ever is strongest), keeping it fine on the starboard bow. When alongside
going astern the transverse thrust will pay the bow off towards the buoy. While
you hold the vessel in position pay out picking up rope, one end of which is
secured on the forward bitts. This picking up rope is passed through the eye
of the buoy and back on board where it is secured.
This rope will now hold you close to the buoy while you pass out and secure
the mooring line that will be shackled to the buoy.
Don’t forget to retrieve the person off the buoy.
The vessel can now be allowed to fall back onto the mooring line by easing off
the picking up rope. (The picking up rope should be left in place if your stay
is not long as you will use it in getting away from the buoy. Allow it to lie
completely slack).
Leaving a Buoy
To leave the buoy the reverse of the mooring procedure must be adopted. The
vessel is about to proceed and is lying back on her mooring line that is shackled
to the ring of the buoy.
Put a person on the buoy and if the pick up rope was removed, pass the pick-up
rope or wire exactly as you did when tying up to the buoy.
Bring the vessel close up to the buoy so that the weight is taken off the mooring
line. You can do this with the engine or by taking the weight on the picking
up rope.
With weight now taken off the main mooring line it can easily be unshackled
by the person on the buoy.
Retrieve the person off the buoy.
Let go of the picking up rope.
As the vessel moves astern the picking up rope will be drawn through the eye
of the buoy and clear of it allowing the vessel to proceed out of the mooring.
Interaction
The motion of a vessel causes an increase in water pressure at the bow and stern
and a reduction in pressure amidships. Interaction occurs when the normal flow
of water around the hull is restricted by the influence of shallow water, a
breakwater, dredged channel or by the close passage of another vessel.

Shallow Water Effect
- Squat
In shallow water, vessels may experience significant changes in manoeuvring
characteristics including:
• loss of rudder effectiveness
• therefore increase
the vessel’s turning circle
• reduction of output
power, i.e. speed
• increase the vessel’s
stopping distance
• increase in draft
(reduced freeboard)
• change in trim
This change of trim is commonly known as ‘Squat’ (Shallow Water
Effect, or Smelling the bottom) and has the effect of increasing draft when
this is least desirable. Vessels with fine hull lines will squat by the stern
and a barge shaped vessel will tend to squat by the head.
To reduce the effects of squat reduce your vessel’s speed.
When entering shallow water you may notice the bow and stern waves move forward
and also experience excessive vibration.
Canal Effect
When operating in proximity of breakwaters, dredged channels or banks allowances
need to be made for the effects of Interaction. The bow and stern of the vessel
will be repelled whilst the body of the vessel will be attracted to the obstruction.
This creates little problem if the obstruction is continuous and you can travel
in the middle of the channel created, all the forces balance. If it is not continuous
or you must travel on one side there is a tendency for the bow to sheer, i.e.
pushed away from the closest bank, and you will need to compensate for this
effect by reducing speed and carrying helm (wheel).

Interaction between Vessels
The pressure fields of two vessels in close proximity on the same or opposite
headings will Interact and require corrective action to maintain course. The
large suction zone around the longer of the two vessels may be the dominating
factor in Interaction between vessels of significantly different size. This
may present a very dangerous situation for the smaller vessel, particularly
if it is overtaking.
Factors that increase the risk of interaction are, high speed, large size vessel,
narrow channel and shallow water. The pressure waves that create Interaction
are proportional to the square of the vessel speed, thus the effects of all
forms of interaction can be instantly reduced by reducing speed. In some cases
consideration will have to be given to the loss of steering control associated
with speed reduction.

(Small Ships Manual QT)
The sketch above shows the reaction of vessel ‘B’ as it is overtaken
by vessel ‘A’.
Overtaking vessels should avoid passing too close in open waters when there
is room to manoeuvre, and be particularly cautious in narrow channels when overtaking
or being overtaken.
Difficult conditions
Wind, Waves and Surf
As we all know, wind causes the surface of the water to become disturbed
and at times, this can produce uncomfortable and dangerous conditions for a
small boat.
Seawaves:
Are caused by the direct local action of the wind. As the wind gets to about
8-10 knots the crests of the waves steepen until they become unstable and break
producing white caps.

Wave crests developing
The strength of the wind, the length of time it has been blowing and the uninterrupted
distance it blows over will determine the size of the waves. This distance is
called ‘fetch’. We measure waves as in Figure 1.36b below.

Wave height and length
Swell :
Is a more regular wave motion caused by a large disturbance (like a storm),
sometimes quite some distance away. It will continue after the disturbance has
gone and can travel for long distances in deep water. By itself, swell is usually
not dangerous until it moves into shallower water where the energy ‘spills’
out of the crests causing heavy breaks. This happens near sand bars, reef and
along the coast.
The Period of Encounter:
If encountering heavy weather and rough seas is unavoidable, it should be remembered
that rough seas not only make the vessel uncomfortable, but can also cause extreme
structural damage; often the first and most convenient action is to slow down
the vessel’s speed or change course, particularly if the seas are on the
stern or quarter. Taking a big sea head on, or a point or two off the bow results
in the safest way of handling the situation.
Unpredictable high waves and dangerous conditions can be caused by seawaves
on top of a heavy swell especially when there is a change in the depth of water.
Wave hight may be 40% higher than predicted by the BOM.

A dangerous breaking
sea
It is vital to know the performance capabilities and limitations of your boat
before venturing out into the open sea. It is even more vital to know your capabilities
and to be aware of the dangers of rough seas.
There are no hard and fast rules as to what sized boat will handle certain wave
heights, as other factors such as currents and the proximity of reef and sand
bars can cause unpredictable conditions. Generally though, a 3.0m boat would
find a 1.0m sea heavy going while the limit of safety even for an experienced
person in a 6.0m boat would be about 2.0m
Tidal streams
Tidal streams tend to have an even stronger influence than wind on our ability
to handle our vessel. This is because if the body of water is moving, all boats
must move in the same direction and speed as the water, regardless of whether
they are stopped or moving. Think about the following definitions:
Speed through the water is the actual speed that your
boat is being propelled through the water by our engine.
Speed over the ground is the speed that you are actually
moving from one
point to another which is a combination of our engine speed and the speed of
the current. Consider the following examples.
You wish to berth in a tidal stream of 2 knots. If you berth with the tide,
maintaining a speed of two knots through the water to give us steerage, we are
actually approaching the jetty at a speed of four knots over the ground. To
actually be stationary alongside the jetty to get your lines on you have to
be going astern at two knots!
If you stem the tide, while stationary alongside you are still moving forward
through the water at two knots to counteract the current. This helps your control
with an outboard motor and is essential with a fixed propeller and rudder. You
will go further into this at Coxswain level and above, but for the moment the
golden rule is: approach your berth, your mooring or your anchorage into the
current if at all possible, while still being aware of the wind.


When berthing or making landfall, the current will take you off your intended
track just as wind will. In the figure below to follow desired path we need
to steer into the current.


Coming into a port with
a narrow opening and dangers either side presents the same problems. To ensure
we stay on our intended track we use transits. This means that we keep two marks
in line, regardless of our ship’s head, as shown below.


Small craft and
heavy weather
At Sea follow some basic rules in heavy conditions:
· Don’t be there! Never go to sea if there is any doubt and if
conditions deteriorate, go back to port or seek shelter.
· Watch your speed – don’t go too fast and adjust to minimise
the amount of water coming on board.
· Take great care turning in seas. Even in slight seas, slow down.
· Keep a good look out for the ‘big’ wave for if your boat
becomes swamped you are totally at the mercy of the elements.
· Keep your bilge pump working or that bucket handy so you can keep your
boat as dry as possible.
· Prepare life saving gear, and get passengers into life jackets.
When manoeuvring in protected water, wind still causes problems. It effects
all boats differently depending on their weight, draft, windage and the angle
the wind is coming from in relation to our course.
Our small boat is light and has little draft and so a fresh wind can cause some
handling problems. Remember also that the slower we go, the more time the wind
has to work on us, but as sometimes we have to go slow, allowances need to be
made.
Berthing is one such situation. When making your approach to a jetty you can
either end up ‘short’ of your berth or too far off the jetty to
get your first line (spring) on, depending on the direction of the wind.
Regardless of where our bow is pointing we must always be aware of the track
or path our boat is following.
Below, we have a 20 knot onshore wind and we wish to berth between two other
vessels. By watching our boats head and not the track we are actually following,
we will follow the curved path shown and may get too close to vessel B. If we
leave it too late, when we turn hard to port causing our stern to move to starboard
we are in danger of making contact.
The next figure shows that we will be blown further away from the jetty and
our final approach will be too steep. Being almost bow on will make it difficult
to secure ourselves alongside.


Coming to anchor and picking
up a mooring are other manoeuvres where wind can play a part. Be aware of it
and anticipate the effect. Use it to your own advantage if you can. Unless there
is a strong current manoeuvring into the wind gives us better control because
there is less windage and we can approach more slowly.


Large craft and
heavy weather
Ideally a vessel at sea should avoid heavy weather conditions, this is often
not possible. If adverse weather is expected or encountered action should be
taken to ensure the safety of the vessel, passengers and crew.
A prudent Master should be aware of the vessel’s sea handling ability,
knowledge of the vessel’s stability, how to handle the vessel in adverse
weather conditions and steps to take to prepare the vessel for heavy weather.
Check:
• The anchor gear
to see that the anchor is secured, the stopper fitted, winch brake on, spurling
pipe and any other openings made watertight.
• Heavy objects or
cargo that could be safely stowed below decks should be shifted.
• Deck cleared of
any loose debris or equipment. All equipment on deck is made secure.
• All watertight doors,
hatch covers and openings to below deck secured and water tight.
• Freeing ports and
scuppers checked to see they are free and working and a deck life line rigged.
• Bilges should be
pumped, and any tanks, if possible, either emptied or pressed up to reduce loss
of stability through “free surface” effect.
• Engine, steering
gear. Perform routine checks and maintenance.
• Life saving and
fire fighting appliances. Have flares, grab bag and lifejackets on hand.
• Put position on
chart and report to a shore station with a radio check.
• Have a meal and
prepare simple food for later.
Running before heavy seas is dangerous because the hull is lifted by stern and
you can lose steerage and power often leading to a situation where the vessel
may commence to surf down a wave and “broach” or even capsize. Also
when running before heavy seas there is the possibility of the vessel being
“pooped” or swamped by a following sea, which can lead to broaching
or capsizing.
To avoid broaching and pooping, reduce your vessel’s speed to 1/3 of the
waves speed.

Boarding and Quartering
Seas
When the sea is on the bow, the vessel rolls and pitches simultaneously, and
the resistance of the vessel’s headway reduces the angle of roll. When
the vessel runs with the sea however, the roll increases because there is less
resistance forward, and the wave runs past the vessel more slowly and stays
in contact longer. The result is a pronounced roll and pitch and the possibility
of heavy seas being taken over the stern. Because the sea is traversing the
vessel from astern, the rudder is less effective, and the vessel may be slewed
across the waves and broach. The added weight of water from boarding seas can
produce the danger of a capsize.
To avoid excessive strain on the hull and impact from waves taken over the bow,
reduce speed and alter course placing the sea just off the bow.
Beam Seas
When a vessel is beam on to a sea it rolls heavily. When the period of encounter
approaches synchronisation with the period of roll, the vessel’s motion
will be violent. To avoid synchronisation alter course and speed to change the
period of encounter.
Turning In Heavy Weather
Do it before it is necessary, for example, before the vessel finds itself in
jeopardy off a lee shore. Turn in a smooth, a period when the waves are momentarily
flatter than the prevailing sea condition. Start the manoeuvre as soon as the
wave crest has passed the vessel (1). Reduce engine speed to allow the sea to
pass quickly. Turn the wheel hard over and turn the vessel in the trough between
the crests. Try to turn fast enough so you are head-to the next wave. Apply
power to complete the turn quickly but don’t gather too much headway (2).
Reduce speed as soon as the vessel is nearly head-to-weather (3).

Spreading oil from astern
may assist. Don’t turn when there is water on deck. Prudence dictates
turning well before damage or loss of stability dictates. A stern trawler with
a ramp may have to turn to weather before other vessel types because the sea
will run up the ramp and break on the deck. High bulwarks ordinarily make it
comfortable to work, but become a water trap in these conditions. Freeing ports
must be kept clear.
Heavy Weather Handling
Taking the seas on the port or starboard bow lessens some of the pitch (1).
At the right speed, going to weather is safer than having the weather abeam
or astern. When the conditions warrant, reduce speed and let the swells roll
by, or even use a drogue or sea anchor (2). Avoid the trough except in an emergency.
When you are moving broadside to the waves, turn the wheel momentarily to take
larger crests on the windward bow, then return to course when conditions permit
(3).
When the conditions become unmanageable and the weather is deteriorating a vessel
should ‘hove-to’ and avoids risking damage to the vessel and further
endangering the crew and passengers. To heave to a vessel should reduce speed
to maintain steerage way with the sea either on the bow or on the quarter. In
the extreme situation of being unable to control the vessel, stop engines and
drift with a sea anchor until the conditions improve.

Sea Anchors
The sea anchor or drogue can be deployed in many situations, for example, in
deep water where the conventional anchor is impractical. It can be used to slow
the progression of the vessel in a distress situation, or when a vessel is being
driven faster than the wave train in a following sea. When streamed from the
bow in heavy weather (heaved to) it will keep the bow into the wind and waves,
easing the stress on the vessel and creating a degree of comfort for those on
board.
In the situation of a sea anchor being needed, but one not being available,
suitable substitutes can be created using such material as: bundles of nets
or bags, berthing lines or short lengths of wood, tied in such a way it can
be deployed to retard the vessel’s progression.
The sea anchor when deployed from the vessel’s bow or stern should have
enough scope so that the vessel and the sea anchor will not be on subsequent
wave crests at the same time. (Fig 3.23 below).

Crossing a bar
A bar is an accumulation of sand or silt at the entrance of a river or a lake.
The build up could occur due to a current running across the mouth of the river
or entrance of the lake, depositing sand across it. Also, rivers can deposit
silt at their mouths where they meet the sea.
Bars cause the waves to get steeper and in some cases break as they get to the
bar. For this reason it is important to take a number of precautions and manoeuvre
the vessel with extreme caution over a bar. Crossing bars should be avoided
if the wind and waves are in opposition as may occur during strong land breezes
or offshore winds, rough weather or ebb tides.
If you intend to cross the bar for the first time or even one that you are familiar
with, ensure that you check with the local Marine Rescue Organisation or Harbour
Master. They will be able to give you the latest condition report, additional
information regarding the safest passage over the bar, the peculiarities of
it and the best crossing time. Always check the tides and weather report.
How to cross a river bar
The answer is with great care ……!
If in doubt, don’t go out…
because once started you are committed to crossing the bar.
When crossing the bar the following factors need to be amongst those taken into
consideration:
• State of tide, always
cross with incoming tide.
• Always wear life
jackets.
• Ensure all loose
gear is stored and secured.
• If any, trim slightly
by the stern.
• Keep everyone sitting
and still.
• Before approaching
the bar test engines (both ahead or astern), steering and draw fuel from a full
tank.
• While approaching
the bar keep a close lookout for depth of water, smallest waves, where the breakers
are, etc.
• Monitor the prevailing
wind
wave pattern timing, i.e.
looking for sets
course to follow
bar traffic
alternate route, some bars
are multi-direction
The preferable time to cross
a bar is at the high tide, or during the first of the run in.
The worst is at low tide
and half way through the ebb tide, or with rivers experiencing flooding.
If crossing outbound, against the incoming waves:
If possible observe the
bar from a high headland for at least twenty minutes to see if a regular set
of larger swells is running. Take note of the interval, because if you do not
want to have to encounter those larger swells, your vessel must be capable of
crossing over during the time of the lull.
Planing craft:
· Approach the surf
zone and look for a lull.
· Power to the first wave and ease off over the crest to prevent becoming
air borne.
· Repeat this process until clear, looking for the lowest part of each
wave.
· If there are leads marking the channel they will be behind you, you
may need someone talking you through so you can keep your eyes ahead.
· Don’t hesitate to work your throttle to keep your bow into the
sea.
· You may ship a little water but if you take it steady all should be
well.
Displacement craft:
• Motor slowly to
the breaking waves looking for the area where the waves break last or even better,
not at all. Wait for a flatter than usual stretch of water and motor through.
• If there seems no
respite in the waves slowly power through each oncoming wave ensuring that you
are not going too fast over each wave. In a light craft this would result in
becoming airborne and lead to swamping on landing, or in a larger craft would
cause the vessel to “bottom out” if it pitches heavily.
• In light conditions,
make the crossing with the waves slightly on the bow so that the vessel gently
rolls over the crest of each wave. If you do have to encounter large swells
or white water, ensure the vessels head is dead on, to avoid broaching and a
consequent roll and capsize.
If crossing inbound, with the incoming waves:
The shoals of a bar rise
steeply at the outer face, and from at sea the tell tale white water can be
hidden on the shoreward side of the swells.
When approaching the bar
keep a good lookout for changes in the water colour, the bluer the water, the
deeper it is. Breakers that are steeper at one section of the wave front indicate
shallow water. Never anchor near the edge of a bar or a rogue swell may surprise
you.
If possible observe the bar from a safe position offshore for at least twenty
minutes to see if a regular set of larger swells is running. Take note of the
interval, because you need to enter on the back of the last of the set of larger
swells.
Approaching from sea, increase power of the vessel to catch up behind the last
of the bigger set of waves and position the vessel on the back of the wave (ensure
the vessel does not “surf” down the face of the wave).
Planing craft:
· Identify a compass course or high shore feature as a steering mark
for when the swell builds up in front of you and you are steering blind.
· Your boat must be capable of more speed than the waves (20 –
30 kts).
· If you slow down there is a danger that the wave behind will ‘poop’
you. If swamped you will slow even further, lose steerage and be at the mercy
of the breakers.
· Don’t go over the wave you are on. You will surf and once again
steerage will be lost and you could bury your nose into the wave in front or
loose steerage and turn side on to the waves and roll over (broaching).
· If there is insufficient depth of water and you touch bottom, all of
the above apply and you are in serious trouble.
Displacement craft:
Ensure there is insufficient
depth of water.
Prepare your vessel and passengers as you would for heavy weather to address
watertight integrity, trim and safety gear (close openings, trim by the stern
and wear lifejackets). Use your most competent helmsman. Approaching from sea,
increase power of the vessel to catch up behind the last of the bigger set of
waves and position the vessel on the back of the wave (ensure the vessel does
not “surf” down the face of the wave).
· Identify a compass course or high shore feature as a steering mark
for when the swell builds up in front of you and you are steering blind.
Your vessel is unlikely to attain the swell speed (20 – 30 kts) so waves
will overtake you during your crossing of a significant river bar.
· Steer directly with the waves and be ready to counteract the potential
broach by timely helm and power thrusts.
· Do not attempt to turn around on the bar itself.
Beaching a small craft
Beaching your boat in surf presents the same risks as crossing a bar.
Unless in an emergency situation you should never beach a boat that the occupants
can’t physically man handle and drag up the beach. Unlike crossing a bar,
you don’t have deep calm water at the end of the manoeuvre so you must
get your boat away from the breakers.
For the above reasons, the beach should neither be rocky or too steep. Tell
your passengers the plan and don’t try it if you have any doubts. You
risk personal injury and damage to your boat and motor.
By now you must realise that the dangers are being pooped (swamped) or broached
(turning over because you got beam onto the waves). Both of these are likely
if you touch bottom, and you have to sooner or later!
The safest way to approach any beach is stern first. The sized boat that we
can man handle will (or should be) equipped with oars, so try variations of
the following:
· Just before you get into the breaks, put your bow into the sea and
prepare your oars.
· You can either row in backwards from there or use your motor for part
of the way.
· You must tilt your motor before it touches the bottom or the bow will
rise up and you will end up beam on.
· Just before or as your stern touches, everyone out and pull like mad!
If you haven’t guessed already, you are going to get wet
To help keep your bow into the sea you can use your anchor. Drop it when you
turn just outside the breakers and keep some tension on the cable as you feed
it out. The oars are used to help manoeuvre you in as the wave action will do
most of the work anyway. The anchor will be most useful when you are leaving
by once again keeping your nose into the sea.
Small boats and shallow water
Confined water can mean many situations including channels, rivers, anchorages,
harbours and in or near reef and shallow water.
In any of these situations, the most important factors are speed and keeping
a lookout. We must have ample warning and be able to stop in time to avoid dangers.
The wake of your boat at speed is a danger and a source of annoyance to other
vessels. Most confined water is speed restricted, so obey the limits. We can
only look at some of the problems you may come across in confined water. It
is up to you to use common sense and caution.
Channels are used to show boats the safest passage through dangers or shallow
water and would generally be marked. We will go into the rules and markings
in the next section. They are used by a variety of boats and can be quite busy.
Watch your speed and don’t get too close to other vessels, especially
large ones. They are not as manoeuvrable as you, so keep out of their way!
Busy harbours present similar problems including lots of traffic, large vessels
berthing or unberthing with tugs, and crossing ferries. Keep your speed down
and keep as far away from other boats as you can.
Rivers present problems of their own as the temptation is for more speed, but
be alert for the following:
· Keep to starboard and slow down around bends where visibility is restricted.
· Water clarity is usually poor, hiding snags and fallen trees especially
near the banks.
· The water will be deepest on the outside of bends where it travels
faster. Sand and mud bars build up on the inside where the water slows down.
· After heavy rain there will be strong currents and debris running down
stream. Keep a good eye out for logs and other rubbish.
Reef can be encountered at any time and so some local knowledge is important.
If you have none, ask the locals and study a chart of the area. Keep speed down
unless you are sure that you have plenty of water around and under you. Reef
comes up quickly and is very very hard!
If you are going near reef deliberately, perhaps for fishing, look for the following
signs:
· Change in colour of the water.
· Waves breaking more heavily or in a different pattern.
· In ‘glassy’ conditions the water will lump up over shallow
parts.
Use polaroid sunglasses. They make it easier to pick colour change and see into
the water.
If fishing near reef take heed of the following:
· Use of ‘reef pick’ rather than a danforth or plough anchor.
· Be wary of anchoring on the windward side in case your anchor doesn’t
hold – never if you have a motor that is hard to start or if the seas
are heavy.
· Watch out for that larger than usual wave even if you are on the lee
side of the reef. They can break right over the top!
Emergencies
It would be nice to think that we would never have to face an emergency situation.
With proper planning, preparation and skill this may well be the case, but there
is always that ‘other bloke’! Having thought about possible problems
and decided on a plan of action may help you ‘think on your feet’
and save the day. When you take on the roll of skipper you take on total responsibility
for your boat and passengers.
Total disasters include:
· Holing your boat seriously and sinking.
· Colliding with another vessel or person in the water.
· A major fire on board.
· Being swamped or capsized in heavy seas.
These are life threatening situations and would all indicate a failure on your
part to take proper care. You had better hope that your pre-departure planning
was better than your execution because you need HELP!
We are not going to discuss these situations in detail as our studies so far
have been directed toward avoiding such things. Please remember to be safety
conscious at all times.
Let’s look at some less tragic situations that you may encounter and should
be able to handle.
Breakdowns:
Engine breakdowns are something that happens to us all over time but can minimised
if we take the care necessary to keep our motor in good working order. Regular
maintenance can make the difference between a good day out and a disaster. Engines
usually give you warning that problems are developing, by being hard to start,
running roughly etc. We don’t go to sea unless to the best of our knowledge
we are going to make it home again.
Let’s assume we have done all of the right things, are out at sea and
we strike problems. What could be the problem and what can we do about it?
· In any situation where you lose power your first job is to get back
into control. Where am I, how deep is the water, am I in danger of drifting
onto a reef or the beach? Anchor up if you need to and you are back under control.
You can then turn your mind to the problem knowing that you and your passengers
are safe – temporarily at least. If the water is too deep to anchor but
you can drift safely and gently while you turn you attention to the problem,
your luck is in. In choppy conditions, put out your sea anchor or a line with
anything that produces drag attached, in order to keep your bow into the wind.
Use your imagination if you don’t carry a sea anchor. What else could
you use?
What are the most likely problems? A small boat without gauges to indicate fuel
levels and temperature means you have to keep your eye on things constantly.
· Check your fuel. Do you need to change tanks? Has a connection come
loose? We are assuming that you were carrying enough for your planned journey!
No fuel means no hope.
· Have you been constantly checking your ‘tell tale’ to ensure
you have cooling water circulating? Come out of gear and double check your ‘tell
tale’. You may have weed or a plastic bag over your intake. Shut down
and check. If this is not the problem you may have water pump problems. Your
‘tell tale’ may be blocked with corrosion, but after restarting
at idle you should get turbulence from your main outlet near the propeller.
No turbulence, no ‘tell tale’, no hope! Don’t destroy your
motor, if you haven’t already, by running it without cooling water.
· Long periods at idle speed can cause your engine to stall due to a
build up of oil on the spark plugs. If you are trolling and your motor starts
to run roughly, go into neutral and put on some revs for a short while. If your
motor won’t start after stalling, take out your spark plugs and dry them
off. Give them a wipe with a rag and a good blow!
· The ignition (spark producing) system on a modern outboard is contained
in a closed circuit ‘black box’. If you are sure you have fuel and
the plugs are clean, with all connections OK, check to see if you are getting
‘spark’ by taking out a spark plug, earthing it to the body of the
motor and turning over your engine. You should see a ‘spark’ at
the tip of your plug. Check all of your plugs to make sure it wasn’t just
one plug faulty although this would have produced a ‘miss’ in your
engine rather than causing it to shut down all together.
· Propellers can cause their share of problems. Always check before departure
that it is on securely and that the locking device is keeping the nut from working
loose. The rubber bush should show no signs of deterioration and the blades
should not be bent or badly chipped. At sea your propeller can be fouled with
weed or rope. Your engine may labour or the propeller starts to cavitate. It
is a simple matter to raise the leg and clear it. A damaged propeller should
get you home if you take it slowly. A lost propeller won’t!
· Batteries must be kept in good condition and fully charged. If you
have minor problems and you have to crank your motor over for some time, a defective
battery will go flat very quickly. If going offshore it is a good idea to take
your car battery as a spare.
Carry a basic set of tools including screw drivers (two types), a plug spanner,
pliers and a couple of shifters of suitable size.
If working over the side of the boat on your engine, don’t drop anything!
If going offshore, spare spark plugs and a spare propeller, nut and washer are
a good idea.
Towage
With the master’s obligation to render all assistance as may be possible
to a vessel
in distress, the occasion may arise for you to provide a tow or be towed. Remember
by law the only time you can refuse to give assistance is if it is impractical
or places your vessel or crew in danger.
In all other cases, to avoid any legal complications, before providing a tow
or being towed, determine with the other party, a place of safety to be towed
to, and payment, if any.
The following factors must be amongst those considered before taking another
vessel in tow:
• Does the exercise
endanger your vessel or crew.
• Duration of the
voyage.
• Whether you have
sufficient fuel allowing for the additional drag.
• The effect of the
delay to your own vessel.
• The power of your
engines.
• Notify the owners
and insurers of your vessel.
• Enter into a Lloyd’s
Open form of Salvage agreement, if appropriate.
In the event of being towed or towing, establish contact with the other vessel
and establish who can supply the strongest and most efficient towing gear, preferably
rigged as shown in the sketch. When the most efficient towing arrangement is
rigged, the next thing is to pass over the tow, this may call for a degree of
thought with particular emphasis on safety. The circumstances and weather conditions
may govern this, it may be as simple as coming alongside the other vessel or
as complicated as floating or transferring a messenger line prior to connecting
the tow.

During the tow contact must
be maintained either by radio or prearranged signals and a visual watch should
be kept on the tow. Remember the vessel being towed is in charge. The appropriate
lights and shapes required by the collision regulations should be displayed
if possible.
Towing is dangerous. Keep all personnel well clear.
If towing in heavy weather, ensure that you use a long and heavy towing line
which should dip in the water (catenary). This prevents the movement of either
vessel from jerking the towing line reducing the chance of it parting. Also:
• Ensure the towing line is not chafing.
• Freshen the nip,
i.e. pay out the tow line to reduce chafing.
• Grease the line
at the point of contact with the vessel.
• Ensure that the
tow line can be released in an emergency under all conditions of load.
• If the towed vessel
is manned use its steering gear.
To reduce yawing or sheering by the towed vessel:
• Stream a sea anchor behind the vessel being towed
• Trim it by stern
by transferring weights.
• Alter course and/or
speed.
• Increasing speed
tends to correct a yaw directly caused by list.
• Decreasing speed
tends to correct a yaw produced by adverse trim.
• Set the towed vessel’s
rudder at an angle to counteract the sheer.
Remember when commencing the tow increase speed slowly and monitor the tow line,
the towed vessel and your own vessel’s performance.
It is possible to assist a vessel in sheltered or confined waters, by simply
coming alongside the other vessel and making fast with bow, stern and spring
lines. The two vessels must be positioned so that the propulsion and steering
gear of the assisting vessel are well aft of the other vessel and in clear water,
in this manner even larger vessels can be assisted and manoeuvred. Using this
method of towing in confined waters gives the towing vessel better control over
the tow.

Emergency stops
Some of the dangers associated with emergency stops were mentioned earlier but
we will go through the main points again. Remember that if we keep to a safe
speed appropriate to the conditions we should always be able to bring our vessel
safely to rest. If you have to stop quickly, remember the following points:
· Bring your motor back to idle. With the reduction in power the boat
will come off the plane and settle into the water. This will take off most of
your way.
· Your stern wave will catch up with you causing your stern to lift and
your boat to move forward on the wave.
· From idle forward engage astern and apply sufficient throttle to complete
your stop without excessive cavitation.
· When ‘dead’ in the water, come into neutral.
The main dangers associated with the emergency stop are:
· Your stern wave catching up with you and swamping your motor and boat.
This is because you have applied astern power and are actually backing into
the wave.
· Transverse thrust causing your motor to pivot to port (right handed
propeller) so keep a firm grip on the wheel and be prepared for your boat to
swing off course.
· Damaging your gearbox and/or your propeller bush by going from full
ahead to full astern. To avoid this you need those few seconds to allow your
motor to come back to idle. Remember that if your boat is moving forward, even
if you are in neutral, the propeller is turning. Reversing the turn at speed
is about the same as going from forward to reverse in a car without stopping.
Man overboard
A common cause of loss of life at sea is a person falling overboard. It is perhaps
more common on larger vessels where people are moving around the decks. On smaller
boats it should not happen because everyone should be seated, but just in case
it does, you should have a plan in mind.
The person in the water is in serious trouble because:
· They are likely to be injured from the fall and may have struck themselves
on the boat.
· They are fully clothed without flotation support making it hard to
stay afloat.
· In rough seas and especially at night they are very difficult to see.
In a small planing boat if the person is seen to fall over, it is unlikely that
you will have travelled very far before pulling off the power. It is still vital
that no time is wasted. This is where your boat handling skills may save a life.
· Grab a life jacket and throw it towards the person in the water. It
may provide some support, but if too far away it will at least give you a direction
to follow remembering how hard it is to see a head in the water especially at
night.
· If the person is close to the boat, don’t be tempted to back
up to them.
While either you (or someone else for preference) keeps their eye out and gives
you directions, execute a turn (which suits the sea conditions) and approach
the person into the wind or current, coming out of gear just as you reach them.


Getting them back on board
will depend on the condition of the person, the seas and the height of the gunwale
you may throw them a line with a loop in one end large enough to go over their
shoulders and under their arms. If another person goes into the water to help
someone seriously injured, make sure they have a lifeline back to the boat.
If you are going to drag them to a duckboard at the stern, shut down your engine.
If you were the only other person on board, what would you do? Give some thought
to the possibilities of what you could do and what you should not do.