HAND
TOOLS
Contains extracts courtesy
of A.N.T.A publication’s and TAFE “Electrical trades -Tools & Equipment Pt
1”
CONTENTS
Measuring Tools
Marking Out And
Making a Component
Dismantling And Assembling
Measuring Tools
Measuring
accurately:
Any measuring
tool is liable to damage if it is bumped or dropped. In particular, any
instrument that gives readings of 0.1 mm or less:
• Can be damaged or put out of adjustment by unskilled handling.
• Must be checked regularly to ensure it continues to give accurate
readings.
They can be checked against working standards of measurement ‑
precisely made steel gauge blocks. Note that steel expands when the temperature
rises and contracts when, the temperature fails. Thus measuring accurately is
affected by changes in temperature.
When
using screw pitch gauges, radius gauges or form type gauges, you should, where
possible, hold the work piece and gauge in front of a light background. This
allows you to clearly see any differences between the work piece and the gauge.
Basic
Measuring Tools:
Using
Standard Gauges
Screw Pitch Gauges
A
screw pitch gauge is used to find the pitch of a thread. It is a series of thin
marked blades which have different pitched teeth. Thread pitch gauges also come
in the standard thread forms of metric, Whitworth, BSF, UNF, and UNC which
allows both the pitch of the thread to be gauged and the form or shape of the
thread, to be checked. Each set of screw pitch gauges has the thread form
stamped on it.
Measuring Thread Pitch
Before using a screw pitch gauge, you should measure
the approximate pitch of the thread with a rule. To do this for metric threads:
• put the
rule on the thread parallel to the thread axis.
• line up a major division on the rule with the top or crest
of the thread.
• count
the number of crests to another major division, usually 20 - 30 mm.
• divide
the length between the major divisions by the number of crest counted.
• the answer is the pitch of the thread.
• then choose the gauge closest to this pitch for the first
try.
 For imperial threads the method is similar except
that the pitch is given as threads per inch (TPI) and so the number
of crests in one inch are counted.
For imperial threads the method is similar except
that the pitch is given as threads per inch (TPI) and so the number
of crests in one inch are counted.

Screw pitch gauge U
se
of screw pitch gauges
Radius
Gauges
They
are used to check internal and external radii. The gauges are a set of thin
blades with a convex (external) and concave (internal) radius of the same size
on each blade. The size of the radius is marked on each blade. When the radius on the gauge less than 90 degrees, the gauge is
called a fillet gauge.


Using a radius gauge
Radius
gauges
Feeler
Gauges
They
are used to measure or set clearances between mating parts or for measuring the
width of small slots or grooves. In a metric set of feeler gauges the thickness
ranges from 0.05 mm to approximately 1 mm in varying steps. The gauges can be
built up to produce the thickness required. When using the thinner gauges care
should be taken to pull the gauge through a gap rather than push, as by
pushing, the gauge will tend to bend and wrinkle or possibly if a sideway
movement is used the gauge will tear.


Checking clearances with feeler gauges
Feeler
gauge
Thickness Gauges
A
thickness gauge is used to measure the thickness of material using a plunger
and dial. These gauges are used to measure sheet materials such as paper,
plastics, cardboard, leather and sheet metals. They must be handled carefully
and kept away from dirt and moisture and returned to their storage box
immediately after use.

Form
or Profile Gauges
These
gauges are used to compare shapes. They can be a fixed shape or profile, or an
adjustable type as shown. With the adjustable type, the gauge is set to the
master shape as shown, and then compared to the shape being checked.


Adjustable profile gauge
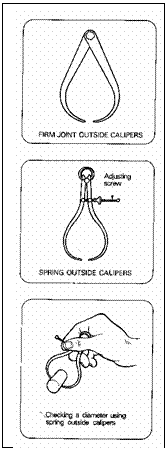
Callipers
Callipers are used to
transfer measurement:
They consist of two legs that
are firmly
screwed or fixed together
so that they will
maintain the position in
which they are set.
Some types of callipers have
a spring‑loaded
joint and an adjusting
screw to position the legs.
The accurate transfer of
measurement when
using callipers,
depends upon the feel of
the callipers against
the work. This 'feel' is
the light pressure of
the callipers as they pass
over the work.
Skill is needed to obtain the
correct 'feel' of
callipers.
Using outside callipers

Outside callipers are used:
• To measure outside diameters
• To measure external dimensions
• To check whether external surfaces are parallel.
Check
the diameter of work using outside callipers
and a
rule as follows:
• Open the jaws of the callipers until they pass
clearly over
the diameter to be measured. The
work must be
stationary when taking readings.
• Gently tap the back of one leg of the callipers
against a solid
part of the work to slightly close
the jaws.
• Try the new setting over the
work.
Keep
the callipers at right angles to the axis of the work.
Continue
to adjust the callipers and check the setting
until you feel the jaws just bear against the work.
When
the adjustment is correct, the calliper jaws touch
so lightly that the weight of the callipers is
sufficient
to make them pass over the diameter of the work.
When
you have adjusted the callipers to have the correct
'feet' against the work, proceed as follows:
• Place a graduated steel rule
flat on a machined or
flat
smooth surface.‑
• Hold the callipers so that one
jaw is against the end
of the rule.
Make sure that the calliper jaws lie on a
line parallel
with the edge of the rule.
• Read off the measurement at the
other jaw.
 This measurement will be the
diameter of the work.
This measurement will be the
diameter of the work.
Practise
obtaining the correct 'feel' of the calliper jaws against the work by adjusting
the callipers over various diameters. Try setting the callipers on flat
parallel material.
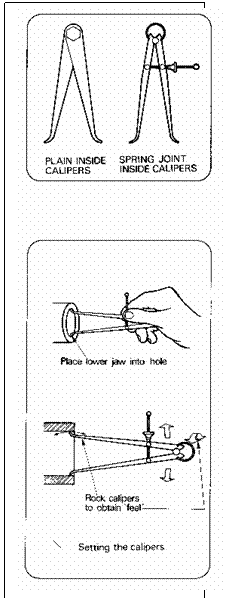
Using inside callipers
Inside callipers are used:
• To measure internal diameters
• To measure internal dimensions
• To check whether internal faces are parallel.
Check the inside diameter of
a hole using spring inside
callipers and micrometer as
follows:
• Hold the
callipers lightly in your right hand with your thumb and first finger on the
adjusting nut. Support the weight of the callipers with the middle or third
finger.
• Place one leg of the callipers
just inside and at the bottom of the hole.
• Open the
callipers' legs by the adjusting screw until the other leg touches against the
top of the hole.
• Rock the
callipers slightly on the lower leg and adjust the screw until you obtain the
'feel' of the callipers in the hole.
Try moving the top leg at
right angles to the other
movement. This will ensure
that 'feel' is being obtained
directly opposite the
bottom leg.
Graduated
Measuring Tools
Steel
Rules
Steel
rules measure lengths to a degree of accuracy of approximately ± 0.5 mm. As a
common instrument, it is often misused. The end of the rule must be maintained
with its edge square and sharp. A common error is caused by not sighting across
the rule at right angles to the graduations. This is called parallax error.


Measuring
Tapes
Like
any other measuring device care is essential for reliable operation. The blade
or tape must be cleaned as it is withdrawn into the housing otherwise it may be
difficult to withdraw or if the tape is dirty when it is withdrawn the markings
on the tape may be obliterated or damaged causing difficulty in reading.


Depth Gauge
It
can be used to measure the depth of holes, slots, or the distance from an edge
to another surface.

Vernier
Callipers
Standard
vernier callipers measure to within 0.05 mm (0.002 in) and 0.02 mm (0.001 in).
Digital callipers are available with an accuracy up to
0.01 mm (0.0005 in).


They
can be used to measure outside, inside and depth features. They must be stored
in a clean, dry place preferably in the pouch or box in which they were
originally bought. It is essential that the corners of the inside and outside
jaws are protected against damage otherwise inaccurate readings will result.
Hold the vernier so that you are looking at
the scale at an angle and in line with the graduated line. Look along rather
than at the line. Move into a position where the light strikes from the back of
the vernier scale at about the same angle as your
line of sight.
Vernier callipers can be read from
zero up to the length of the main scale, often 250 millimetres or more. They
may also have provision for taking depth readings.
 Reading
a Vernier:
Reading
a Vernier:
• Read the main scale to the left
of the zero of the vernier in millimetres.
• Now look at the vernier scale below. Note which one of
the vernier divisions is opposite a line on the main
scale.
• Each of the lines on the vernier scale represents adivision
that is 0.02 of a mm shorter than those of the main
scale. Multiply the number of the line on the vernier scale by 0.02 and add the
result to the reading
of the main scale.
The next sketch shows the reading on a vernier.
There are 37 full divisions on the main scale to the left of the zero. This
equals 37 millimetres.
The thirty‑third line on
the vernier scale is opposite a line on the main
scale giving:
33 x 0.02 = 0.66mm
Now add 0.66 mm to the main
scale reading of 37 mm to give a total reading of 37.66 mm.
Certain metric verniers with the vernier scale
49 mm long have each fifth line of the vernier scale
numbered from 1 to 10. As each division on the vernier
scale represents 0.02 mm, then the fifth line representing 5 x 0.02 which
equals 0.1 mm is marked number 1. The tenth line is marked 2, the fifteenth
line marked 3, and so on to the end of the scale.
Read this type of scale as
follows:
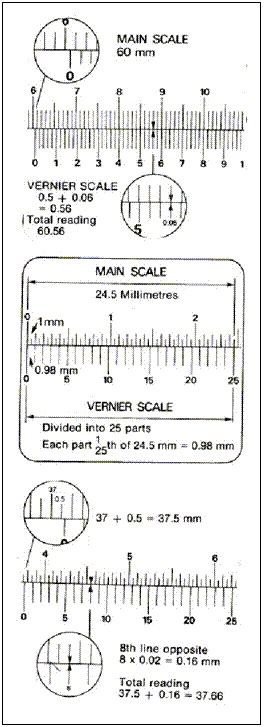 • Read the
main scale as before.
• Read the
main scale as before.
•
Read the numbered divisions of the vernier scale
as tenths of a millimetre.
• Complete the reading by adding
the extra 0.02 lines.
Example of a vernier
settings:
The main scale reads 60 millimetres. The vernier shows the fifth line which represents 0.5 mm, plus 3 extra
divisions which represent:
3 x 0.02 = 0.06 mm.
Total reading is 60
+ 0.5
+0.06
= 60.56 mm
Some metric verniers have their main scale divided into millimetres and
half millimetres, with the vernier scale made 24.5 mm
long and divided into 25 equal parts.
The length of each vernier division is therefore one twenty‑fifth of
24.5 mm which equals 0.98 of a mm.
The vernier
scale divisions are again 0.02 of a mmshorter than the corresponding main scale millimetredivisions,
The last sketch shows the
reading of a vernier reading to 0.02 of a millimetre.
It has a vernier scale 24.5 mm long.
There are 37 major divisions on the main scale to the left of the zero,
which equals 37 mm. There is also one half‑millimetre division which
equals 0.5 mm.
37 + 0.5 = 37.5 mm
The eighth line on the vernier scale is opposite a line on the main scale.
Multiply 8 by 0.02 which represents 0.16 and add this to the reading of the
main scale.
Main scale 37.50
Vernier scale + 0.16
Total reading =37.66 mm
Exercise – Practice
reading the Vernier as shown below:

Micrometers
 They enable veryaccurate measurements
to be taken. Outside micrometers are used to measure:
They enable veryaccurate measurements
to be taken. Outside micrometers are used to measure:
• Outside diameters
• Thickness of material
• Lengths of parts.
They are available in various
sized frames. All sizes, however, have a measuring range limited to the length
of the thread on the spindle.The range is 0 to 25
millimetres.
The principal parts of a micrometer are:
Frame
Anvils
Spindle and Thread
Sleeve or Barrel
Thimble.
A knurled collar or a small
lever on the frame can be used to lock the spindle in the barrel.
After the anvils have been
set against the work being measured, tighten the spindle lock. This prevents
any movement of the spindle while you are reading the micrometer scale.
Remember to loosen the clamp
before attempting to take any further readings.
 Principles
of a micrometer:
Principles
of a micrometer:
The principle of a micrometer
that reads to 0.01 of a millimetre is explained below.
Hold a 0‑25 mm outside
micrometer by the frame between thumb and first finger of your left hand. Keep
the graduations on the sleeve towards you.
Loosen the spindle lock.
Use the finger and thumb of
your right hand
on the knurled part
of the thimble to screw it
anti‑clockwise. This moves the
spindle to the
right and uncovers the
graduations on the sleeve.
Look at the gap between the
anvils. It is equal to the uncovered 'length of the datum line.
Look at the datum line on the
sleeve. It is graduated into millimetres and half millimetres, from zero up to
25 mm, and each fifth millimetre is numbered.
Turn the thimble until zero
is level with the datum line. Note the position of the graduation on the
sleeve.
Turn the thimble one
complete turn. The thimble will
move along one graduation of the sleeve scale. This
is because the pitch of the thread on the spindle is
half a millimetre. Two turns of the thimble move the
spindle one millimetre.
Look at the
graduations around the thimble.
There are 50
graduations and each fifth graduation
is numbered

Now
wipe the face of the anvils with a piece of clean cloth. Screw the thimble
inwards towards the frame until the anvils are touching.
• Close
the anvils gently. Never apply force.
• Allow
your fingers to slip on the knurled part of the thimble.
• Look at
the scales. They should both read zero.
• Open the anvils by turning the thimble to uncover one division on
the thimble scale.
The movement of the anvil = 1 of a complete turn. 50
1
50 of 0.5 mm
= 0.01 mm
• Continue turning the thimble until the tenth line of the thimble
is level with the datum line.
• Hold the micrometer up to the light. By carefully looking at the
anvils you should be able to see a small gap. It is 0.1 of a millimetre.
• Continue
turning until the fiftieth line of the thimble is level with the datum line.
The anvils will now be 0.5
of a millimetre apart.
The first graduation on the
sleeve will now be visible.
Turn the thimble one more
complete turn to open the anvils to 1 millimetre.
If
you find that the micrometer does not read zero when the anvils are touching
and you are sure that they are clean, the micrometer needs adjusting.

R
Reading a metric
micrometer:
• Read on the barrel scale the
number of
millimetres
that are completely visible.
• Add any half millimetres that
are completely visible.
• Note the
number of the graduation on the
thimble scale that is level with the datum line.
• Add the thimble reading to the
other reading.
The sketch shows a micrometer
set to a reading.
There are 5 millimetres
between the zero and the thimble. There is also one graduation of 0.5 of a
millimetre. The twelfth fine of the thimble scale is level with the datum line.
The reading of the micrometer would be:
5.0 mm
+ 0.5 mm
+ 0.12 mm
= 5.62 mm
 Using outside micrometers:
Skill is needed to obtain accurate
measurements when using a micrometer.
Excessive pressure during adjustment will:
• Give inaccurate readings
• Cause strain on the thread
• Distort the frame.
As you adjust the micrometer
anvils against the work, you should feel a light pressure or resistance against
the surface. Develop this 'feel' by constant practice, measuring articles
of accurately known size.
Some micrometers have a spring‑loaded
ratchet which will ensure constant adjusting pressure.
Accurate measurements can be
made with the
assistance of the ratchet,
provided the micrometer is kept square to the work.
Measure with an outside micrometer
as follows:
Hold the outside micrometer
in your right hand,
with the graduations
on the main scale towards you.
Support the frame on the lower
centre of your
palm. Use the little
or third finger to hold the frame
to the palm.
Place the middle finger
behind and supporting the
frame.
Keep the first finger and
thumb free to adjust the
knurled thimble.
 Close the anvils until you
feel them just touching the work.
Close the anvils until you
feel them just touching the work.
Allow
your finger and thumb to slip on the knurled thimble to obtain the correct
pressure.
Move
the work slightly between the anvils or pass the micrometer over the work by
moving your wrist.
Make
any further adjustment of the thimble until you obtain the right 'feel'.
When
you are satisfied with the feel of the anvils against the
work, proceed as
follows:
• Remove your fingers from the thimble.
• Turn the micrometer towards you.
• Read the measurement.
Sometimes‑
it may be more convenient to hold the
micrometer with both hands by:
• Supporting
the frame between the fingers and thumb
of your left hand
• Using
the thumb and finger of your right hand to adjust
the thimble.
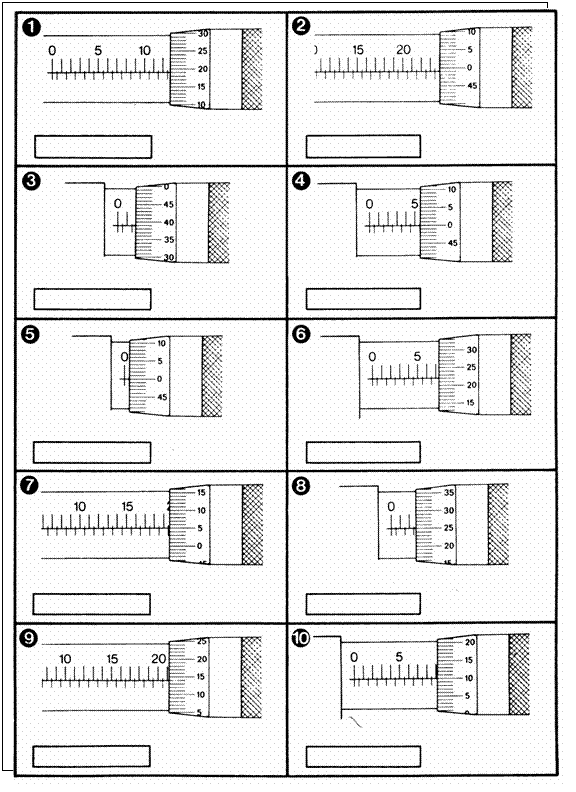
Exercsie - Read the Micrometers 1. to 10. shown below:
Care During Use
When
using any measuring instrument, whether it be a gauge
or a graduated instrument, the points listed should be carefully followed.
1 Never drop the instrument
2 When not in use leave the
instrument in its case or on a clean rag, never on a hard steel bench
3 Never allow dirt, filings,
cutting oils or any other foreign substances to come in contact with the
instrument
4 Do not put the instrument on
top of or under other instruments or tools
5 Never measure moving
objects.
6 Ensure
that the instrument is correctly set to zero before use
Storage Procedures
Correct
storage procedures will lead to long and reliable service from any gauge or
graduated measuring device. The following points should be observed when
storing these instruments.
1 Clean the instrument
thoroughly during and after use
2 Lightly oil or wrap the
instrument in oiled paper
3 Store the instrument in is
own case or in a box where it is protected from outside damage
4 Store the
instrument in a dry place away from corrosive chemicals or solvents
Marking Out And Making A Component
Hammers
Hammers
impart a force either directly or indirectly through another tool such as a
chisel or punch to a workpiece. The most common
hammers used are:
Soft Faced Hammers
Hammers with copper,
rawhide or plastic are suitable for panel beating, shaping thin metal sheet and
assembling finished parts to give a light force fit. Soft Headed Hammers
(rubber) are suitable for positioning
work where you do not want the hammer to rebound
Claw Hammers
Claw hammers with jaws at
the reverse of their heads are suitable for nailing, striking all metal chisels
and extracting nails.
Ball Pein
Hammers
The
ball pein or engineers hammer is the most common of
the hammers used by mechanical trades persons. It has
a convex face for striking tools such as punches, chisels, centre punches or
the workpiece itself. The opposite end of the hammer
head is a hemispherical ball pein used to dome or
shape the shanks of rivets or to stretch the surface of a metal workpiece to straighten it.
The
weight of the hammer must be chosen to suit the job. For example, where a heavy
blow is required in a confined space, a heavy hammer should be used because its
large mass will be able to deliver a large amount of energy to the workpiece or tool without being made to move fast.
The
hammer handle should be in good condition and of a size that is comfortable to
use.
It
should be square with the head and fit tightly into the head. The hammer should
not be used if either the head or the handle is damaged, because a burred or
chipped head will cause injury if it hits the hand holding a tool such as a
chisel, while a split handle may injure the hand holding the hammer.
Cross Pein Hammers
A special purpose engineering hammer that comes in a
variety of masses up to 450 g (1 lb). Larger sizes are called sledge hammers and are suitable for driving a large shafts out of a pullies
etc. The cross pein hammer is
also used in confined spaces or for straightening or stretching when the metal
is peined at right angles to the direction of stretch
or curve.


Ball pein hammer
Cross pein hammer
Cutting Tools
Chisels
Cold
chisels are forged from tool steel. Only the point of the chisel is hardened
and tempered, the body being left soft. If the head of the chisel were hard it
would chip as the result of the hammer blows.
The point of the chisel if formed into a cutting
edge. This cutting edge is
similar in nature to other cutting edges in that it requires the edge to be
sharp.


Cold chisel
Correct cutting
angle and position
Clearance
or relief angle is shown. The cutting action of a chisel is somewhat different
from that of a lathe tool, in that the clearance or relief angle is determined
by the operator in the manner that the chisel is held in relation to the work
piece. The size of the cutting angle should be about 70° for soft steel; when
chipping harder metals the angle should be a little larger and for softer
metals it can be ground smaller.
Chisels selection
Flat chisel are used to cut out of thin metal sheet. Diamond‑point
and round‑nose chisel chisels can draw‑over a drill point that has
begun to cut off centre. Diamond‑points also can chip out a weld that has
cracked. Cross‑cut chisels
can cut out the length of a narrow groove.
Care Of Chisels
Because
chisels are subjected to continual impact loads, they are likely to show signs
of metal fatigue or cracking after a period of use. In this condition they will
become dangerous as small pieces of metal or splinters may fly off at high
speed causing injury to the operator or to people standing nearby.
A
new chisel should be used lightly until it is proved to be sound and only then
should heavy blows be used on it.
A
major problem associated with the use of chisels is the mushrooming of the head
due to the fact that the head is soft and the constant hammering on the head
distorts the metal as shown in. The head of the chisel should be kept in good
repair by keeping the chamfer ground cleanly.
When
resharpening a chisel care must be taken not to raise the temperature of the
cutting edge above the temper temperature. Ideally when grinding a chisel
cutting edge no colour should show on the surface but a very light straw colour
would not reduce the hardness of the chisel edge.

Mushrooming is a dangerous condition

Six common chisel shapes
Files
Files
are used to reduce or smooth the surfaces of the work. They are made from a high grade tool steel and pass through a
process which includes forging, dressing of the surfaces by filing or grinding,
forming of the teeth and heat treatment.
They
are very hard and brittle and must not be used as levers, packing or wedges,
nor should they be hit, because of the danger of shattering.

Outline views of a flat file
Convexity Of A
File
Most
files are made with their faces slightly “bellied” or convex, along the length.

The belly on a file
Slight warping is likely to
occur during heat treatment and if files were cut perfectly flat,
one side might be concave after heat treatment and be useless for filling flat.
If perfectly flat in the
natural state, the pressure applied at the ends when filing would cause the
file to bend and become concave on the cutting face while the operation was in
progress.
The convexity of a file
restricts the number of teeth which contact the work surface and thus reduces
the load required to make the teeth penetrate the surface of the work.
The convexity will make a
small allowance for the tendency to rock the file as it is used, and will thus
make it easier to file flat.
Single Cut And
Double Cut Files
The
teeth of a file are formed in one of two ways in that they maybe “single” cut
or “double” cut.

Single cut Double cut
The
teeth of a single cut file extend from one edge of the file to the other
without interruption. This broad, continuous tooth has a scraping action on the
work surface and produces a good finish. The teeth of a double cut file are
pointed and are able to bite more deeply into the work surface than the single
cut file. They are able to cut quickly and do not clog (that is, become
“pinned”) as easily as the single cut file. Most files are double cut.
Coarseness Of
Cut
For
the more commonly used files, the coarseness of cut is defined by name: rough,
coarse, bastard, second cut, smooth and dead smooth. The most commonly used
grades of cut are bastard, second cut and smooth. Figure 10 shows a comparison
between these grades.

Bastard
Second
Cut
Smooth
These
terms, expressing the grade of cut of a file, are related to the size of the
file in that a 300 mm second cut file is coarser than a 150 mm second cut file.
The cut of very small files is classified by numbers. Nos 00, 0, 1, 2, 3. 4, 5, 6, 7 and 8. No. 00 is the coarsest. The most commonly
used grades are Nos 0, 2, 4 and 6.
File Shapes And
Types
Files
are made in a wide range of shapes and types, some for general purpose use and
others for special applications.
The Common File Shapes
Flat File:
Tapered in width and thickness, double cut, used for
general purpose filing.

The flat file
Hand File:
Tapered
in thickness only, sides parallel, no teeth on one side (i.e. one safe edge),
double cut, same application as the flat file.

The hand file.
Square File:
Tapered on all sides, double cut, used for roughing
down flat surfaces and enlarging square holes.
![]() The square
file
The square
file
Round File:
Tapered, single or double cut, used for enlarging
round or curved holes.
![]() The round
file
The round
file
Half Round File:
Tapered,
double cut except that those finer than bastard cut are single cut on the
convex surface. It is widely used because of its combination of flat with
curved surface and ability to reach into restricted openings.

The half round file
Three Square File:
Tapered,
double cut, triangular cross sectional shape, used for filing sharp internal
angles.

The three square file
Warding File:
Tapered
on edges only, double cut, its thin section allows it to reach into narrow
slots.

The warding file
The Size Of A
File
The
size of a file is specified by its length as measured from the heel to the
point.
Classification Of
A File
In general, files are classified by length, name or
type and grade of cut.
For example: 300
mm flat second-cut file
200
mm half round bastard cut file.
Care Of Files
Storage
Files should be stored in a clean, dry place to avoid
the possibility of rusting or having oil or other liquids come in contact with
the cutting face.
The cutting edges of a file must be protected from
damage by keeping files separated from other files or hard metals. That is,
they should not be placed or thrown across each other on the work bench or
stored by bundling them together in a draw.
It
is good practice to clean files before storage so that they are ready for use
when needed.
File Safety
Never use a file as a lever. Files are very hard and
brittle and are likely to snap if used in this way.
Never use a file without a correctly fitting handle
as the tang of the file is likely to pierce your hand as you push forward on
the working stroke.
A poorly fitted handle can come off the tang on the
return stroke in which case you may loose balance and fall over or suddenly
find yourself pushing forward towards an exposed tang.
Never
use a file with a split or splintered handle.
Removal Of
Scale
Scale
on black steel is hard and abrasive and will quickly spoil the sharpness of the
cutting edges. The cutting edges can be protected by removing scale from the
surface of the workpiece with the edge of the file or
with an old file or in some cases with a hammer and chisel.
Order Of Use
It
is good practice, where possible, for the first use of a file to be on softer
materials such as brass, bronze or grey cast iron, and after it has lost its
initial sharpness to use it on steel.
Pinning
Particles
of metal are likely to wedge in between the teeth of a file. This is called
“pinning”. These particles of metal may stand higher than the teeth and can
cause scratches in the work surface. Pinning can be minimised by rubbing chalk
into the face of the file.
Cleaning Files
Files
can be brushed and cleaned with a small stiff brush known as a “file card”

![]()
Hacksaws
Hacksaw blades are made from alloy tool-steels and
high-speed steel. The blades are available in two types. These are:
All
hard:
The
“all hard” type blade is hardened throughout and is more rigid than the second
type. It is recommended where the workpiece is
securely supported and an accurate cut is required.
Flexible:
The
flexible blade is hardened on the cutting edge only, the remaining portion of
the blade being in a toughened state.
The
blades are unbreakable in normal use and are preferred where the workpiece is not securely held or where the operator is
unable to control the movement of the saw properly.

Pitch Of The
Teeth:
Hacksaw
blades are made with a range of tooth pitches to enable them to cope with a
variety of job situations.
| Material
to be cut |
Hard - Alloy & High
Carbon Steel |
Medium
Hard - Mild, Medium Carbon
Steel |
|||||||||
|
Up to 3mm |
32 TPI |
32 TPI |
|||||||||
|
3mm - 6mm |
24 TPI |
24 TPI |
|||||||||
|
6mm - 13mm |
24 TPI |
18 TPI |
|||||||||
|
13mm - 25mm |
18 TPI |
14 TPI |

The Hacksaw Frame
The
hacksaw frame is either fixed in length to take a certain length of blade or
adjustable and able to take a range of blade lengths. The frame shown below is
an adjustable frame.

Blade holding piece may
be set in any of four positions
All
hacksaw frames have a means of tensioning the blade because it is most
important that the blade be properly secured.
If
the blade is not tight enough the downwards cutting load will unduly bend it
and it will likely break. It will also be difficult to guide the blade, during
the cut, because of its lack of stiffness. Over tightening of the blade will
also lead to blade breakage.
The
blade will be sufficiently tight when it cannot be easily deflected by either
the fingers or the cutting force.
When
the hacksaw is not in use the tension should be let off the blade and frame by
loosening the wing nut by one or two turns.
Hacksaws,
like any other tool require regular maintenance. The tension piece and wing nut
should be cleaned and lightly oiled from time to time and the handle should be
checked for any burrs, sharp edges or splinters or cracks if it is a wooden
handle.
Snips
Tin
snips or snips are used to cut sheet metal. They come in a variety of styles
for different cutting operations.
The
two main types of snips are universal snips and aviation snips.


Universal
snips
Aviation snips
Both
these types of snips may be obtained in right hand or left hand cut, and in
straight or offset stylet. Th figure below shows the
correct side the waste should be on when using right hand or left hand snips.


Safety With
Snips
When
cutting sheet metal, sharp edges are formed that can cut a hand or finger very
easily. Therefore take extra care when cutting with snips, that your hand or
fingers are well clear of the sharp metal edges.
Some
snips have handles that come together when the snip is closed. Ensure that the
palm of your hand will not be nipped by the handles when they come together.
Care Of Snips
Only
use snips for the material they were designed to cut. Never use snips to cut
wire as the cutting edge will be nicked and further clean cuts will be
impossible to make.
Keep
the cutting edges in good condition by lightly honing with an abrasive stone or
by regrinding on a bench grinder.
The
pivot point should be kept lightly oiled and in good adjustment so that the
faces of the blades slide together firmly with minimum clearance.
Cutters And
Strippers
There
is a wide variety of cutters which cut round metals up to approximately 13 mm
in diameter, depending on the tool capabilities.
Cutters
used for cutting round metals above 3 mm diameter are generally known as bolt
cutters whereas cutters that are used to cut round metal below 3 mm diameter
are side cutters. A range of cutters and strippers is shown in the figure
below.

Strippers
are used to remove (strip) the plastic insulation off electrical and other
coated wiring.
Hand Taps
Hand
taps are used to produce internal threads by hand.
Hand
taps are made in sets of three and comprise a “taper” tap, an “intermediate”
tap and a “plug” tap.
The
driving end of the tap is formed into a square to take a tap wrench.

Taper
Plug Bottoming
A set of hand taps
The
tap wrench is adjustable to take a limited range of tap sizes; it is also
double ended in that the driving force, from the operator’s hands, is applied
to each end of the wrench. By applying a driving force to each end of the
wrench, (i.e., by using a proper tap wrench and not a spanner) there is less
chance of breaking the tap due to bending it, because the force applied by one
hand balances the other. It is important to use the correct size wrench for a
tap, because a large wrench will multiply the force of the hands up to a level
where the tap may be overloaded and broken.
![]()
Tap wrench
The Tapping Hole
Size
Before a hole can be tapped
it must be drilled the correct size to allow sufficient metal in the hole for
the thread to be formed by the tap. f too much metal
is left in the hole it will make tapping difficult and increase the possibility
of breaking the tap.
If not enough metal is left
in the hole, the tapped thread will be weak and possibly be stripped when a
bolt is tightened into it.
The correct size drill to
use is best found by referring to tapping size drill tables and using the
recommended size drill for the material and application.
A typical tapping size drill
table is shown.
TAPPING DRILL TABLE
(Reproduced
from the “
To ease the strain of a tap the minor diameter of a
nut thread should be produced by the recommended tapping drill

Dies
Three types of die are in common use:
• The
divided disc type which is made in two separate pieces. The two halves are
attached to a guide plate which secures then and guides the die squarely onto
the shaft to be threaded.
The
guide plate and dies are held in an elastic stock.
• The
button die, which is a disc in one piece, split on one side, is adjusted by
means of a screw.
• The
die nut which is either hexagonal or square in shape,
is operated by a spanner and is used only for cleaning a thread or for removing
burrs. An exception is the pipe threading die nut which is used for thread
cutting.


Scrapers
Scrapers
are used to remove small inaccuracies in surfaces produced by the ordinary
methods of machining such as turning, milling, shaping or planing, or by
filing.
The
scraper is, therefore, used where curved or flat surfaces must be fitted
accurately to each other.
The
scraper is sometimes used to give ornamental effects to machine parts even when
they are not finished to a high degree of accuracy. Srapers
can be made from tool steels or sintered carbide.Tool
steels are more commonly used than is sintered carbide, because of their
cheapness and ease of sharpening.
Scrapers
are made in various forms, as follows:
The Flat Scraper
Flat
scrapers are used for scraping flat surfaces. They range in size from about 150
mm to 300 mm or more in length. The tang should be fitted with a file handle.

The flat scraper
The Half Round Scraper
The
half round scraper is designed for scraping curved surfaces such as bearings.
It is made in a range of sizes.
As
with other scrapers it should be fitted with a file handle.

The half round scraper
The
These
scrapers are also used on curved surfaces, but usually small in diameter. The
three square scraper is also used for removing burrs from the mouth of a hole
while the job is in the lathe.
Three
square scrapers can be easily made from a three square file.
![]()
The three square scraper
The Bull-Nose Scraper
Bull-nose
scrapers are used for scraping large brasses or half bearings. This scraper,
being round on the cutting edge end, can be used with the same action as the
flat scraper and can also be used with the same action as the half round
scraper. It is very useful as a roughing down scraper, but needs to be followed
by a half round scraper for fine fitting.

The bull-nose scraper
Marking
Out Tools
Engineer’s Squares
Engineer’s
squares are available in a variety of sizes. They are accurately made with an
angle of 90°. Squares are used to mark out right angles and to check internal
and external right angles.


Adjustable
blade square
Engineers trysquare
Combination Set
A
combination set is made up of a steel rule, a square head, a protractor head
and a centre square head. The steel rule is used in whichever head is needed
for the job at hand. The square head will also give accurate 45° angles.

Centre Squares
Centre
squares are used to mark out the centre of round material.

Centring a disc
Protractor
A
protractor is used for marking and testing angles. They can be ordinary
protractors as shown, part of a combination set or vernier protractors.

Scriber
Scribers
are made from hardened steel. They are used to mark clear, sharp lines into
metal surfaces. A rule, square or other surface is used as a guide for the
scriber.


Double edge engineer’s
scriber
Pocket scriber
Dividers
Dividers
have hard points. They are used to scribe clear and sharp circles and arcs into
metal surfaces.


Spring dividers Winged dividers
Trammels
Trammels
are used to mark out large diameter circles.


Hermaphrodite Callipers (Jenny, Odd Leg
Callipers)
Hermaphrodite
callipers have a hardened point which is used to scribe lines in metal
surfaces. They are used to find the centre of round material or to mark a line
parallel to an edge.

Prick And Centre Punches
A
prick punch has a smaller diameter point than a centre punch which is ground at
an angle of 60º. It is
used to lightly mark marking out lines so they don’t disappear during other
work. A centre punch is used to make a large indent for
starting a drill and is ground at an angle of 90º. A pin punch is used to drive
out loosened taper pins. Taper drift punches will drive out tight parallel
pins.


Centre punch Prick punch Pin punches
Care Of Hand Tools
Safety
For
any job, select and use the hand tool that will allow the job to be done safely
and within a reasonable amount of time.
Always
use the hand tool for the job it was designed for. Example, do
not use tin snips to cut wire instead of side cutters simply because
they may be close at hand.
Good
job planning will ensure you have the correct tools on hand when required
during the job.
Always
use the tools safely and wear appropriate safety clothing and personal
protective equipment.
Storage
To prevent damage to hand tools during storage,
manufacturer’s recommendations should be followed. These usually include:
• protection of cutting edges and points by covering with a
soft or plastic covering
• cleaning before storage
• application of a rust inhibitor where appropriate
• store in individual compartments/sleeves to prevent damage
through contact with other tools
• release of tension where needed.
Where
a number of people share hand tools, the tools should always be returned to the
same place in good working order.
Faulty Tool Procedures
Faulty
tools should be taken out of service immediately and repaired or replaced at
the earliest possible time.
Never
put a tool back into store or in a toolbox if it requires repair.
Where
a fault is obvious or suspected, a qualified person should determine whether
the tool can be repaired or needs to be replaced.
Repairs
should only be done by someone with the necessary skills and/or training.
Replacement tools should be obtained through normal workplace procedures.
Faulty
tools should be tagged or marked so they are not used while faulty.
Faulty
tools that cannot be repaired should be made inoperative to prevent accidental
use.
Routine Maintenance
Routine maintenance of hand tools involves keeping
the tools in good working condition. This may involve:
• sharpening
• removal of burrs or unwanted sharp edges/corners
• cleaning
• lubricating
moving parts
• applying
rust preventative
• checking and adjusting settings.
Dismantling And Assembling
Safety
Reminders
• Always
wear safety glasses, safety boots, hair protection and suitable clothing while
in the workshop
• Lift
the right way
• Do not
use a machine fitted with a Danger Tag
• Know
where the First Aid station is
• No
running or horseplay
• Use
ear muffs of plugs for protection against noise.
Special
Rules For This Section
• Make
sure you select the right type and size of spanner for each job
• Make
sure the machine is held securely
• Check
the drawing before removing any components to avoid being injured by a flying
spring etc.
Mechanical Tools
Spanners
When
adjusting nuts and bolts, the correct size and type should always be used. This
greatly reduces the risk of damage to the nut or bolt and the spanner. The risk
of
personal injury due to a spanner slipping is also minimised
by
pulling towards the user.The size is determined by the nut
or bolt it fits. The
distance across the flats of a nut or bolt
varies both with the
size and the thread system. There are three
thread systems to
consider:
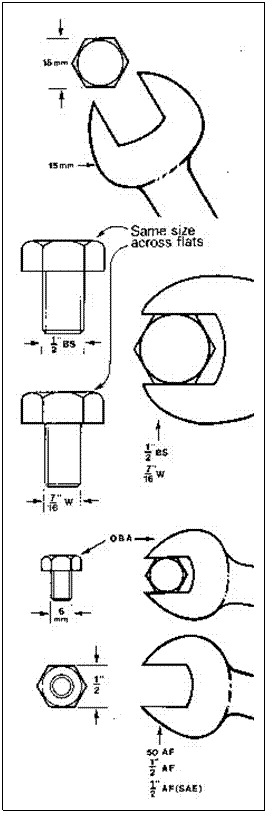 Metric Standard
system
Metric Standard
system
Spanners for metric bolts
are marked with the size across the jaw opening, followed by the abbreviation
"mm,.e.g. 15 mm.
British system
The nominal size of the bolt
is used to identify the spanner.
A spanner to fit a British
Standard bolt with a half‑inch nominal diameter would be marked 1/2 BS.
A spanner to fit a heavy
series British Standard Whitworth bolt with a seven‑sixteenths of an inch
nominal diameter
would be marked 7/16 W.
As the heavy W series will
fit one size above a BS series the 7/16 W spanner will also a fit a 1/2 BS
bolt.
British Association spanners
are made with the size numbers followed by the letters BA.
Unified Standard system
Spanners for Unified bolts
are marked:
with a number based on the decimal equivalent of the
nominal, factional size across the flats of the hexagon before the sign
AF, e.g. 50 AF; or
with the fractional size across the flats before the sign
AF,
e.g. 1/2 AF. As American nuts and bolts now conform to
the
Unified Standard, the SAE series spanners are
interchangeable
with the Unified
series.
Open ended spanners have
their neads offset at 15º to enable full rotation of
a square nut when the shank can move no more than 45ºof arc. Such a spanner
will give full rotation of a hexagonal nut when the shank is limited to 30º of
arc.
Hexagonal nuts ring spanners
(six sided) require 60º before they can be re-engaged.
Double hexagonal ring
spanners (twelve sided) require 30º before they can be re-engaged.
Single End Spanner
Single
end spanners come in a wide range of sizes from very small (5 mm) to very large
(75 mm) or more. They are normally of a heavier construction than other
spanners in the larger sizes so that nuts and bolts may be tightened or
loosened by hitting the spanner with a hammer.

Single-end spanner
Podge Spanner
The
podge spanner is used on bridge and construction work where holes drilled in
steel girders have to be aligned so that rivets or bolts may be put through the
holes. The tapered point is used to enter the two holes and lever them into
alignment.

Podge spanner
Open Ended Spanners
 Open ended spanners are available in ranges of
imperial and metric sizes. They generally have different sizes on each end. Open
ended spanners are usually the easiest to slip over a hexagon but can slip off.
Open ended spanners are available in ranges of
imperial and metric sizes. They generally have different sizes on each end. Open
ended spanners are usually the easiest to slip over a hexagon but can slip off.
Ring Spanners
Ring
spanners are the least likely to slip and/or damage the hexagon they are trying
to undo. They also have different sizes on each end. Ring spanners are offset
to allow clearance for the operators knuckles. Because of the offset there is a
slight tendency for the spanner to roll off the top of the nut when force is
applied.

Combination Open End And
Ring Spanners
Combination
spanners have the same size at both ends. They give the advantages of both the
open end and ring spanners in a single tool. Because the spanner is straight
with no offset, force is applied directly in line with the nut or bolt head and
there is no tendency for a correctly fitting spanner to roll off the top of the
nut or bolt head.

Tube Or Box
Spanners
Tube
or box spanners are made from tubular steel formed at both ends into a hexagon.
Because of their thin wall design, they can be used in places where there is
little clearance between the nut or bolt head and the clearance hole in which
it is located. A spanner can be used on one end to apply force or a bar can be
used through the hole in the body of the spanner to apply the force to tighten
or loosen the nut.

Socket Spanners
Socket
spanners are the fastest way of undoing or doing up a bolt or nut. They are
used with a variety of accessories. They are available as 6 point (single
hexagon) or 12 point (double hexagon). The 12 point socket enables faster
positioning of the socket. Some sockets are available in extended length bodies
specifically designed to remove spark plugs from motor engines.

Socket Accessories

Torque Wrench
Torque
wrenches are used with sockets to tighten screwed parts to a specified tension.

Adjustable Spanner
The
adjustable wrench, commonly called a “shifter” should only be used when a
correct sized spanner is not available. Although it is convenient because it
can be adjusted, the shifter is more likely to slip and cause damage to both
the nut and the operator.

Special Purpose Spanners
There
is a variety of special purpose spanners that are readily available. Some of
those spanners are shown below.


Half moon spanner
Crows foot spanner


“C” spanner Tube nut spanner

Hook spanner
Screw Drivers
Flat screw drivers tips should be a little smaller than the
length of the bottom of the screw slot. Slightly hollow‑grinding them
allows the tip to clear the top edge of the slot while reducing the
amount of downward pressure required when turning the blade. It also brings
the faces of the tip almost parallel to the sides of the slot
Screw drivers are available
with a straight head, a Phillips head or Posi-drive
head. The latter two are unlikely to slip from clean matching recesses but
require more downward pressure than flat tip screwdrivers.
Some
screwdrivers have insulated blades and handles for use in electrical work.


Straight screwdrivers
Phillips screwdriver
Special Drivers
Off
set screw drivers are used when space around the screw prevents a standard
Phillips or flat stubby screw driver from being used.

Impact Drivers
Impact
drivers are used to tighten or loosen screws or nuts by using a hammer blow to
the end of the impact driver. The hammer blow keeps the driver bit firmly on
the head of the screw whilst a helical slide inside the body turns the driver.
Most impact drivers can accept sockets as well as a full range of driver bits.

Impact screwdriver
Hexagon Wrenches
Hexagon
wrenches, also known as “Allen” keys, are used to drive screws with a recessed
hexagon. The keys are available as an “L” shape “Tee” wrench or as hexagon
screwdrivers and usually are supplied in a fold up set in sizes from 1.5 mm to
10 mm. The full range of sizes is from 0.71 mm to 27 mm.

Pliers
There
is a wide variety of pliers available. The most commonly used type is
combination pliers. They are used to hold flat and round material and to cut
small diameter material such as copper wire and shearing split cotter pins.

Other
types include:
• long nose - straight and bent

• slip joint or multi-grips

• circlip - internal and external

• locking
pliers or vice grips

Pipe Wrenches
Designed
to grip pipes or cylindrical couplings, pipe wrenches are available as Stillson pattern, foot print and chain types.

Riveting
Tools
Used
to install pop rivets, there is a variety of light and heavy duty riveting
tools.

Care Of Hand Tools
• use the
right tool for the job
• use the
tools in a safe way
• store
the tools to prevent damage
• return
tools to their right place
• repair or mark faulty tools.
• use the
tool for the purpose it was designed for; i.e. never use files or screwdrivers
as levers
• lubricate
tools as necessary and always store tools lightly oiled or wrapped in oiled
paper to prevent corrosion